THE SCIENCE OF FERMENTATION VEGETABLE, FOOD, HEALTH BENEFITS AND BEGINS RECIPE STEP-BY-STEP GUIDE
By: chef ssentongo
From : Get Easy Recipes/ cook smart pages
The Science and Art of Fermenting Vegetables: A Comprehensive Guide
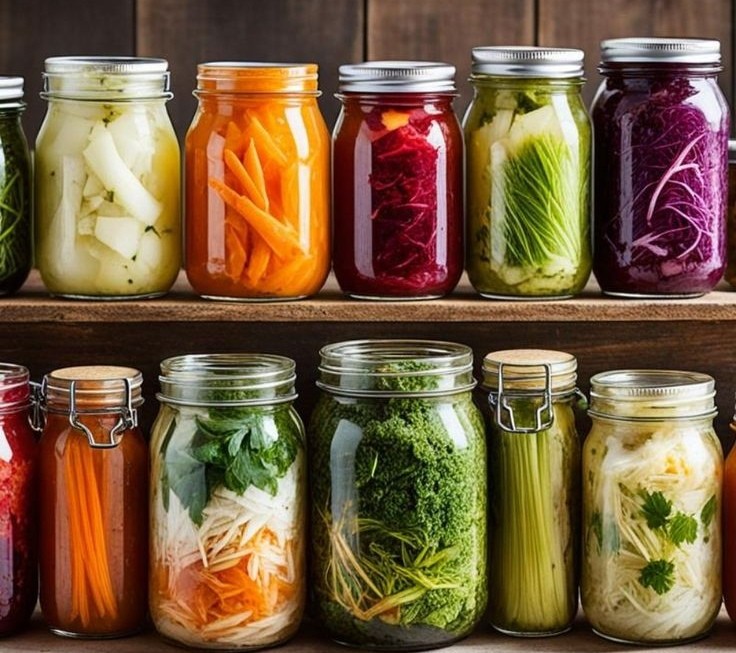
Fermentation is an ancient food preservation technique that has experienced a modern resurgence due to its remarkable health benefits and ability to transform ordinary vegetables into flavorful, probiotic-rich superfoods. This comprehensive guide explores the science behind vegetable fermentation, its numerous health advantages, and provides step-by-step instructions to help you begin your fermentation journey at home.
The Science of Vegetable Fermentation
Fermentation is a metabolic process where microorganisms like bacteria and yeast convert carbohydrates (such as sugars and starches) into alcohol or acids under anaerobic conditions . In vegetable fermentation, the primary process is called lactic acid fermentation, where naturally occurring lactic acid bacteria (LAB) convert the natural sugars in vegetables into cellular energy, producing lactic acid as a byproduct .
This biochemical transformation creates an acidic environment (lower pH) that:
- Preserves the vegetables by inhibiting the growth of harmful bacteria
- Enhances nutritional value by increasing vitamin content (especially B vitamins and vitamin C)
- Improves digestibility by breaking down complex compounds
- Develops complex, tangy flavors characteristic of fermented foods
The microorganisms responsible for this process, primarily various species of Lactobacillus, Leuconostoc, and Weissella, are naturally present on vegetable surfaces and in the environment . These beneficial bacteria not only preserve the food but also create a rich source of probiotics that support gut health.
Health Benefits of Fermented Vegetables
Scientific research has identified numerous health advantages associated with consuming fermented vegetables:
1. Enhanced Digestive Health
Fermented vegetables are predigested by bacteria, making them easier on your digestive system. The probiotics they contain can help restore balance to gut microbiota, alleviate symptoms of irritable bowel syndrome (IBS), and reduce bloating, gas, and constipation . For example, fermented cabbage (sauerkraut) is much more digestible than raw cabbage and causes less discomfort .
2. Boosted Nutrient Bioavailability
Fermentation increases the availability of nutrients by:
- Synthesizing B vitamins (including B12), vitamin C, and vitamin K
- Breaking down antinutrients like phytates that inhibit mineral absorption
- Making minerals like iron and zinc more absorbable
- Releasing proteins, amino acids, and antioxidants
3. Strengthened Immune Function
The gut microbiome plays a crucial role in immune health. Regular consumption of fermented vegetables:
- Supports a healthy balance of gut bacteria
- May reduce risk of infections like the common cold
- Provides immune-boosting nutrients like vitamin C and zinc
4. Potential Protection Against Chronic Diseases
Studies suggest fermented foods may help reduce risk of:
- Inflammatory bowel disease
- Cardiovascular disease
- Certain cancers
- Diabetes
- High blood pressure
5. Safe Food Preservation
The acidic environment created during fermentation (pH typically below 4.6) inhibits growth of harmful pathogens like E. coli, salmonella, and botulism . Well-prepared fermented vegetables can be safely stored for months or even years .
Getting Started: Essential Equipment and Ingredients
Before beginning your fermentation project, gather these basic supplies:
Equipment:
- Glass jars (mason jars work well) – avoid plastic or metal
- Fermentation weights (or small clean stones/ziplock bags filled with water) to keep vegetables submerged
- Clean cloth or loose lid to allow gas exchange while keeping contaminants out
- Measuring tools (scale for accuracy, especially when starting)
Ingredients:
- Fresh vegetables (cabbage, carrots, cucumbers, radishes, etc.) – organic preferred
- Non-iodized salt (sea salt, kosher salt, or pickling salt)
- Non-chlorinated water (filtered or boiled and cooled) if making brine
- Optional flavorings (garlic, ginger, chili peppers, herbs, spices)
Step-by-Step Fermentation Guide
Method 1: Dry Brining (Best for Shredded Vegetables Like Sauerkraut)
- Prepare Your Vegetables
- Wash and finely shred your vegetables (e.g., cabbage)
- Weigh the prepared vegetables to calculate salt needed (typically 2% of vegetable weight)
- Salt and Massage
- Sprinkle salt evenly over vegetables
- Massage vigorously with clean hands for 5-10 minutes until vegetables release their juices and become limp
- Pack the Jar
- Tightly pack vegetables into clean jar, pressing down to eliminate air pockets
- Ensure vegetables are completely submerged in their own liquid
- Use a fermentation weight or cabbage leaf to keep vegetables below brine
- Ferment
- Cover jar loosely or with airlock system
- Store at room temperature (ideal range 50-65°F/10-18°C)
- “Burp” jars daily to release built-up gases
- Begin tasting after 3 days – fermentation typically takes 1-4 weeks
- Store
- Once desired flavor is achieved, move to refrigerator to slow fermentation
- Properly fermented vegetables keep for several months refrigerated
Method 2: Wet Brining (Best for Whole or Chunky Vegetables)
- Prepare Brine
- Mix 2-5% salt solution (20-50g salt per liter of water)
- Stir until salt is completely dissolved
- Prepare Vegetables
- Wash and cut vegetables into desired shapes/sizes
- Pack tightly into clean jars
- Add Brine and Weight
- Pour brine over vegetables, ensuring complete coverage
- Add weight to keep vegetables submerged
- Ferment and Store
- Follow same fermentation and storage steps as dry brining
Troubleshooting Common Issues
- Mold Growth
- White, powdery substance is usually harmless kahm yeast; scrape off
- Colored (especially black, green, pink) mold means contamination – discard batch
- Unpleasant Odors
- Sour, tangy aromas are normal
- Rotten or putrid smells indicate spoilage – discard
- Soft or Mushy Texture
- May result from too-high temperatures or insufficient salt
- Next time, add tannin-rich ingredients like grape or oak leaves to maintain crispness
- Slow Fermentation
- Could be due to cool temperatures – move to slightly warmer spot
- Ensure proper salt concentration
Simple Beginner Recipes
1. Basic Sauerkraut
Ingredients:
- 1 medium cabbage (about 2 lbs/900g), shredded
- 1 tbsp (15g) non-iodized salt
Instructions:
- Mix cabbage and salt in large bowl
- Massage for 5-10 minutes until juicy
- Pack tightly into clean quart jar, pressing down to submerge in liquid
- Weight down, cover loosely, and ferment 1-4 weeks
- Refrigerate when tangy to your liking
2. Lacto-Fermented Carrot Sticks
Ingredients:
- 1 lb (450g) carrots, cut into sticks
- 2 cups (500ml) water
- 1 tbsp (15g) salt
- 2 garlic cloves (optional)
- 1 tsp peppercorns (optional)
Instructions:
- Dissolve salt in water to make brine
- Pack carrots and optional flavorings into jar
- Pour brine over, ensuring complete coverage
- Weight down, cover loosely, and ferment 5-14 days
- Refrigerate when slightly tangy
Incorporating Fermented Vegetables Into Your Diet
Fermented vegetables add vibrant flavor and nutrition to meals:
- Top salads or grain bowls with sauerkraut or kimchi
- Use as condiment with sandwiches or burgers
- Add to soups or stews for depth of flavor
- Enjoy as probiotic-rich snack
Safety Considerations
While fermentation is generally safe, follow these guidelines:
- Always use clean equipment and fresh ingredients
- Ensure vegetables remain submerged in brine
- When in doubt about a batch’s safety, discard it
- Start with small amounts if new to fermented foods to allow your microbiome to adjust
Fermenting vegetables at home connects you to ancient food traditions while providing modern health benefits. With some basic equipment, quality ingredients, and patience, you can transform ordinary vegetables into extraordinary, gut-healthy foods. The process is as much art as science – don’t be discouraged by early failures, as even experienced fermenters occasionally have batches that don’t turn out perfectly . Embrace experimentation, trust your senses, and enjoy the delicious, probiotic-rich results of your fermentation projects.
20 Natural Painkillers: Step-by-Step Recipes
Chronic pain can be debilitating, but nature offers many remedies to help alleviate discomfort without relying solely on pharmaceuticals. Below are 20 natural painkiller recipes with step-by-step instructions to help manage pain effectively.
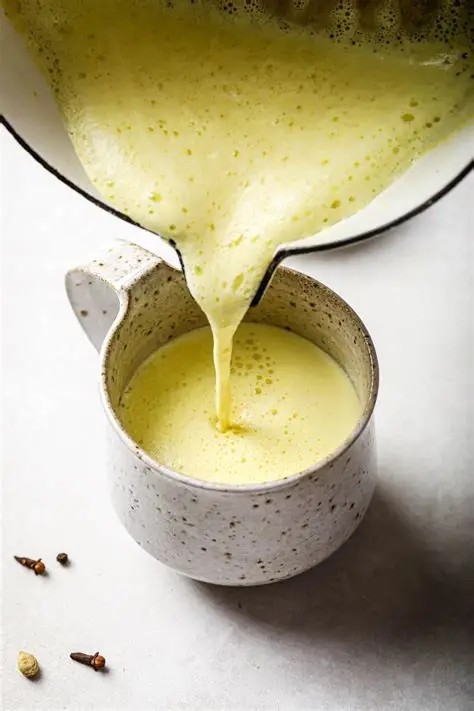
1. Turmeric Golden Milk (Anti-inflammatory)

Ingredients:
- 1 cup milk (or almond milk)
- 1 tsp turmeric powder
- ½ tsp cinnamon
- ¼ tsp black pepper (enhances absorption)
- 1 tsp honey (optional)
Instructions:
- Warm the milk in a saucepan.
- Add turmeric, cinnamon, and black pepper.
- Simmer for 5 minutes, then stir in honey.
- Drink warm before bed for joint pain relief.
2. Ginger Tea (Headache & Muscle Pain)
Ingredients:
- 1-inch fresh ginger root (sliced)
- 1 cup boiling water
- 1 tsp honey
- Lemon juice (optional)
Instructions:
- Steep ginger in boiling water for 10 minutes.
- Strain, add honey and lemon.
- Drink 2-3 times daily for pain relief.
3. Cayenne Pepper Salve (Topical Pain Relief)
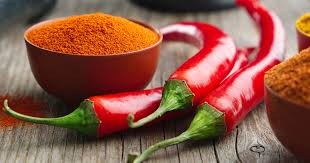
Ingredients:
- 2 tbsp cayenne powder
- ½ cup coconut oil
- 1 tbsp beeswax
Instructions:
- Melt coconut oil and beeswax in a double boiler.
- Stir in cayenne powder.
- Pour into a jar and let cool.
- Apply to sore muscles (avoid open wounds).
4. Epsom Salt Bath (Muscle Relaxation)
Ingredients:
- 2 cups Epsom salt
- 10 drops lavender oil (optional)
Instructions:
- Dissolve Epsom salt in warm bathwater.
- Add essential oils if desired.
- Soak for 20 minutes to relieve muscle pain.
5. Clove Oil for Toothache
Ingredients:
- 2-3 drops clove essential oil
- 1 tsp coconut oil (carrier oil)
Instructions:
- Mix clove oil with coconut oil.
- Apply to a cotton ball and place on the affected tooth.
- Leave for 10-15 minutes (do not swallow).
6. Willow Bark Tea (Natural Aspirin)
Ingredients:
- 1 tsp dried willow bark
- 1 cup boiling water
Instructions:
- Steep willow bark in hot water for 10 minutes.
- Strain and drink (limit to 1-2 cups daily).
7. Arnica Oil for Bruises & Swelling
Ingredients:
- ½ cup olive oil
- ¼ cup dried arnica flowers
Instructions:
- Heat olive oil and arnica in a double boiler for 2 hours.
- Strain and store in a dark bottle.
- Apply to bruises (do not use on broken skin).
8. Peppermint Oil for Headaches
Ingredients:
- 2-3 drops peppermint essential oil
- 1 tsp carrier oil (coconut or almond)
Instructions:
- Dilute peppermint oil with carrier oil.
- Massage onto temples and neck for headache relief.
9. Chamomile Compress (Anti-inflammatory)
Ingredients:
- 2 chamomile tea bags
- 1 cup hot water
Instructions:
- Steep tea bags in hot water for 5 minutes.
- Let cool slightly, then apply as a warm compress to sore areas.
10. Apple Cider Vinegar Tonic (Arthritis Pain)
Ingredients:
- 1 tbsp apple cider vinegar
- 1 cup warm water
- 1 tsp honey
Instructions:
- Mix all ingredients.
- Drink daily to reduce joint inflammation.
11. Lavender Oil for Nerve Pain

Ingredients:
- 5 drops lavender oil
- 1 tbsp carrier oil
Instructions:
- Mix and massage into painful areas.
- Repeat 2-3 times daily.
12. Pineapple & Ginger Smoothie (Anti-inflammatory)
Ingredients:
- 1 cup pineapple
- 1-inch ginger
- ½ cup coconut water
Instructions:
- Blend all ingredients.
- Drink daily for pain relief.
13. Mustard Plaster (Chest & Muscle Pain)
Ingredients:
- 2 tbsp mustard powder
- 4 tbsp flour
- Warm water
Instructions:
- Mix mustard and flour with water to form a paste.
- Spread on a cloth and apply to the chest (avoid direct skin contact).
14. St. John’s Wort Oil (Nerve Pain)
Ingredients:
- 1 cup olive oil
- ½ cup St. John’s Wort flowers
Instructions:
- Infuse flowers in oil for 4-6 weeks in sunlight.
- Strain and apply to painful areas.
15. Rosemary & Juniper Massage Oil (Muscle Pain)
Ingredients:
- 10 drops rosemary oil
- 10 drops juniper berry oil
- 2 tbsp almond oil
Instructions:
- Mix oils and massage into sore muscles.
16. Valerian Root Tea (Pain & Sleep Aid)
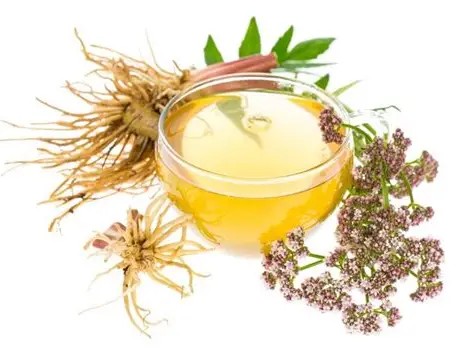
Ingredients:
- 1 tsp dried valerian root
- 1 cup boiling water
Instructions:
- Steep for 10 minutes.
- Drink before bed for pain and relaxation.
17. Comfrey Salve (Bone & Joint Pain)
Ingredients:
- ½ cup comfrey leaves
- ½ cup coconut oil
- 1 tbsp beeswax
Instructions:
- Infuse comfrey in coconut oil for 2 hours.
- Strain, add beeswax, and cool.
- Apply to painful joints.
18. Boswellia (Frankincense) Oil (Arthritis)
Ingredients:
- 5 drops frankincense oil
- 1 tbsp carrier oil
Instructions:
- Mix and massage into joints.
19. Devil’s Claw Tea (Back Pain)

Ingredients:
- 1 tsp devil’s claw root
- 1 cup boiling water
Instructions:
- Steep for 10 minutes.
- Drink 1-2 times daily.
20. Magnesium Oil Spray (Muscle Cramps)
Ingredients:
- ½ cup magnesium flakes
- ½ cup distilled water
Instructions:
- Dissolve flakes in warm water.
- Pour into a spray bottle.
- Spray on sore muscles.
Final Tips:
✔ Stay hydrated – Dehydration worsens pain.
✔ Exercise gently – Yoga and stretching help.
✔ Eat anti-inflammatory foods (berries, leafy greens, nuts).
Would you like a printable version of these recipes? Let me know how I can help! 😊

Leave a comment