HOW TO MAKE BURRATA RECIPE STEP-BY-STEP GUIDE

Here are several detailed recipes for making burrata at home. While the core principles are similar across recipes, the methods vary in complexity, from simpler versions using pre-made cheese to more advanced ones starting from milk.
For a quick overview, the table below compares the key aspects of the different methods found in the search results.
Recipe Approach Key Ingredients Skill Level Process Summary
Using Pre-Made Mozzarella Curd Fresh mozzarella curd, salt, heavy cream Intermediate Stretch curd in hot water, create filling (stracciatella), form a shell, fill, and seal.
Starting from Milk (Full Process) Milk, thermophilic culture, rennet, citric acid, heavy cream Advanced Make mozzarella from scratch, create stracciatella filling from shredded curd and cream, then form the burrata.
Using Leftover Cheeses Pre-made mozzarella, ricotta or mascarpone, heavy cream (optional) Beginner Form mozzarella into disks, fill with ricotta/mascarpone, pinch closed, and chill.
🧀 Detailed Step-by-Step Guide (Using Mozzarella Curd)
This method is a popular choice for home cooks as it balances authenticity with approachability.
Ingredients & Equipment
You will need3/4 pound of fresh mozzarella curd, a generous amount of salt, and heavy whipping cream. Have ready a large heatproof bowl, a slotted spoon, a thermometer, and a small deep bowl for shaping. Wearing gloves or having a bowl of cold water to dip your hands in is highly recommended as the cheese will be very hot.
Step 1: Prepare the Curd for Stretching
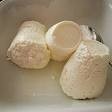
· Cut the mozzarella curd into uniform pieces. You will use about one-third of the total curd for the filling and the rest for the outer shell.
· Bring a pot of water to a boil, then let it cool slightly to around 160-180°F (70-80°C). It should be as salty as pasta water.
· Pour the hot salted water over the portion of curd meant for the filling. Let it sit for a few minutes until the curds begin to soften and stick together.
Step 2: Make the Stracciatella Filling
· Once the curd is malleable, stretch and fold it until it becomes smooth and glossy.
· Pull this mass into a long rope, then tear it into small, stringy pieces. Place these “little rags” (stracciatella) into a bowl.
· Pour in enough heavy cream to saturate the cheese strings and add salt to taste. Stir gently to combine, then set the filling aside.
Step 3: Form the Mozzarella Shell
· Place the remaining mozzarella curd in the heatproof bowl and cover it with more hot salted water. Repeat the stretching process until you have a smooth, lump-free ball of mozzarella.
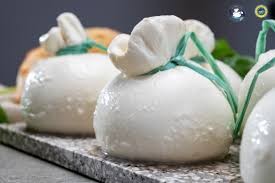
· Instead of forming a ball, shape this mozzarella into a disk about 6 inches (15 cm) in diameter. Make the center thicker and the edges slightly thinner, like a small pouch. If the cheese tears, briefly dip it back in the hot water to repair it.
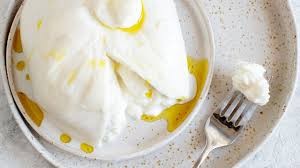
Step 4: Fill and Seal the Burrata
· Drape the mozzarella disk into a small, deep bowl. Spoon a generous amount of the stracciatella filling into the center.
· Gently gather the sides of the mozzarella disk up and around the filling, pinching the top tightly to seal it. Dipping the pinched end back into the hot water for a second can help secure the seal.
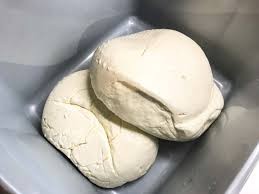
· Immediately place the finished burrata in an ice bath for a few minutes to firm up the shape.
💡 Key Tips for Success
· Don’t Overwork the Cheese: When stretching the mozzarella, stop as soon as it is smooth and shiny. Over-stretching can make the outer shell tough and rubbery.
· Use High-Fat Dairy: For the creamiest, most authentic results, use high-butterfat heavy cream and high-quality milk if making curd from scratch.
· Storage: Burrata is best enjoyed fresh. If you must store it, place it in a container covered with lightly salted water and keep it in the refrigerator for up to 2-3 days. It’s ideal to consume it within 24 hours for the best texture.
· Flavor Variations: You can add other flavors to the filling, such as a drizzle of truffle oil, minced herbs, or chopped pistachios for a unique twist.
I hope this guide helps you embark on your homemade burrata adventure! Which approach are you thinking of trying first?
HOW TO MAKE MOZZARELLA CHEESE RECIPE AT HOME STEP BY STEP GUIDE

Making mozzarella cheese at home is a rewarding process. You can choose between a simpler method using vinegar or a more traditional one with citric acid and rennet. The table below compares these two common approaches to help you decide.
Feature Simple Vinegar Method Traditional Rennet Method
Best For Beginners, quick results Authentic texture and flavor
Key Ingredients Whole milk, distilled white vinegar, salt (optional) Whole milk, citric acid, rennet, cheese salt
Acidifying Agent Vinegar Citric acid
Coagulating Agent Vinegar Rennet
Overall Texture Good, can be slightly less stretchy Typically smoother and more elastic
Difficulty Level Easier Requires more precision
🧾 Ingredients and Tools You’ll Need
Before you start, gather your supplies. Using the right milk is the most critical step for success.
Ingredients for the Traditional Method (1 gallon of milk) :


· Milk: 1 gallon (3.78 L) of whole milk. Do not use ultra-pasteurized (UP) or ultra-high temperature (UHT) milk as it will not form proper curds . Pasteurized but not homogenized milk is ideal, and raw milk is excellent if you can get it.
· Citric Acid: 1.5 teaspoons, dissolved in 1/2 cup of cool, non-chlorinated water .
· Rennet: 1/4 teaspoon of liquid animal or vegetable rennet, dissolved in 1/4 cup of cool, non-chlorinated water . (You can also use a rennet tablet, crushed and dissolved ).
· Salt: 1-2 teaspoons of non-iodized cheese salt, kosher salt, or flaky sea salt .
Essential Tools:
· A large, non-reactive pot (stainless steel is best)
· Instant-read thermometer
· Slotted spoon or spatula
· Sharp knife for cutting curds
· Colander or large strainer
· Cheesecloth (optional, but helpful for cleanup)
· Heatproof bowl for stretching
· Rubber gloves (optional, for handling hot cheese)
👩🍳 Step-by-Step Guide: Traditional Method
Here is a walkthrough using the traditional rennet method, which yields a classic, stretchy mozzarella.

- Acidify the Milk: Pour the milk into your large pot. Stir in the dissolved citric acid solution .
- Heat the Milk: Slowly heat the milk over medium-low heat to 90°F (32°C), stirring gently. Once it reaches temperature, remove the pot from the heat .
- Add Rennet and Coagulate: Stir the dissolved rennet into the milk using an up-and-down motion for about 15-30 seconds to distribute it evenly. Then, stop stirring, cover the pot, and let it sit undisturbed for 5-15 minutes .
- Check for a “Clean Break”: After this time, the milk should have set into a solid gel. To test it, insert a clean knife at an angle and lift it up. If the curd splits cleanly, leaving clear whey, you have a “clean break” and can proceed. If it’s still liquidy, let it sit for a few more minutes .
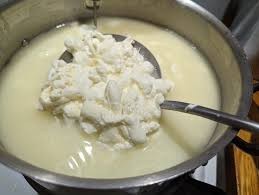
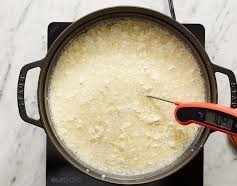
- Cut the Curds: Use a long knife to cut the curd mass into a 1/2-inch to 1-inch grid pattern, making sure your cuts reach the bottom of the pot. This releases the whey from the curds .
- Cook the Curds: Place the pot back on low heat and slowly warm the curds to 105-108°F (41-42°C), stirring gently to keep them from matting. This helps firm them up. Once at temperature, turn off the heat and continue stirring for another 5-20 minutes .
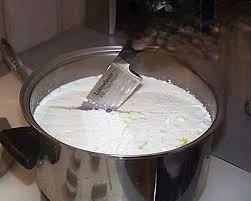
- Drain the Curds: Pour the contents of the pot through a colander to separate the curds from the whey. You can save the whey to make ricotta cheese later .
🧀 Stretching and Forming the Mozzarella
This is the most hands-on and recognizable part of the process.
- Heat the Curds for Stretching: You need to heat the curds to around 135°F (57°C) internally to make them pliable. There are two common ways:
· Using a Microwave: Place the drained curds in a microwave-safe bowl. Microwave on high for 30-45 seconds, then pour off the expelled whey. Repeat heating for 15-20 seconds and drain again until the cheese is hot and starts to melt together .
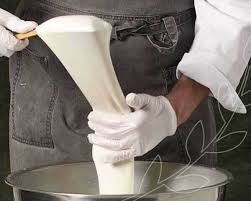
· Using Hot Whey/Water: Heat the reserved whey or plain water to 170°F (77°C). Place the curds in a separate bowl and pour the hot liquid over them. Let them sit for a few minutes until they become soft and stretchy . - Add Salt and Stretch: Sprinkle salt over the hot curds. Put on rubber gloves if the cheese is too hot. Start stretching the cheese like taffy and folding it back on itself. Repeat this stretching and folding until the cheese becomes smooth, shiny, and resistant to stretching .
- Form the Ball: Once the cheese is glossy and pliable, form it into a smooth ball by pulling the edges underneath. You can also make several smaller balls (bocconcini) or shape it into a log for cheese sticks .
- Cool the Cheese: Immediately place the finished mozzarella ball into a bowl of ice water for 10-15 minutes to set its shape and stop the cooking process .
💡 Tips for Success and Troubleshooting
Even with a good recipe, your first batch might need some troubleshooting.
· If your cheese is tough or rubbery, you may have overworked it during the stretching stage. Next time, stretch it less .
· If the cheese is crumbly and won’t stretch, it likely didn’t get hot enough during the stretching phase. Put it back in the microwave or hot water until it reaches the right temperature . Using too much citric acid can also cause this .
· If the curds are soft and mushy, you may not have drained enough whey. Be sure to squeeze the curds well before heating and stretching .
· Storing Your Mozzarella: Your homemade mozzarella is best eaten fresh but will keep in the refrigerator for up to one week. You can store it tightly wrapped in plastic wrap or, for a softer texture, submerged in a light saltwater brine in an airtight container . It also freezes well for up to six months, especially if shredded .
I hope this guide helps you create delicious homemade mozzarella! Which method are you thinking of trying first?
#easyrecipe09 #easyrecipe06 #cooksclub09# #cheeses

Leave a comment