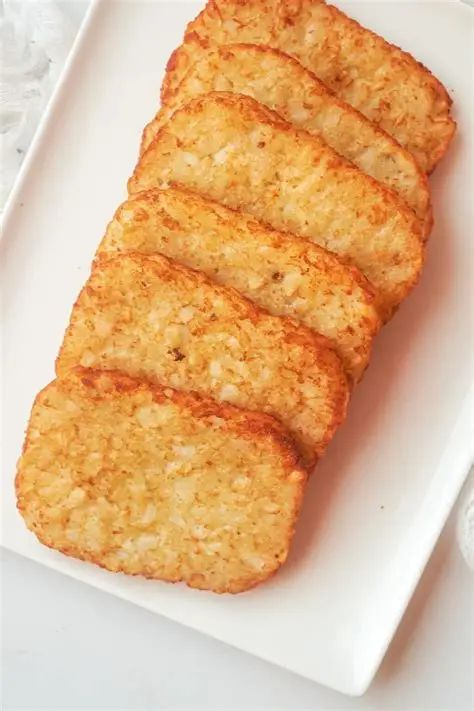
How To make Classic Hash Brown Potato Recipe
Recipe by : chef ssentongo
The quest for the perfect classic hash brown is all about achieving that incredible contrast: a super crispy, golden-brown exterior with a tender, fluffy inside.
The secret lies in removing as much moisture as possible from the potatoes. Here’s a detailed, fail-proof guide to making classic diner-style hash browns at home.
This recipe yields perfectly crispy hash browns every time.
Yields: 2 servings
Prep time: 15 minutes
Cook time: 15 minutes
Ingredients
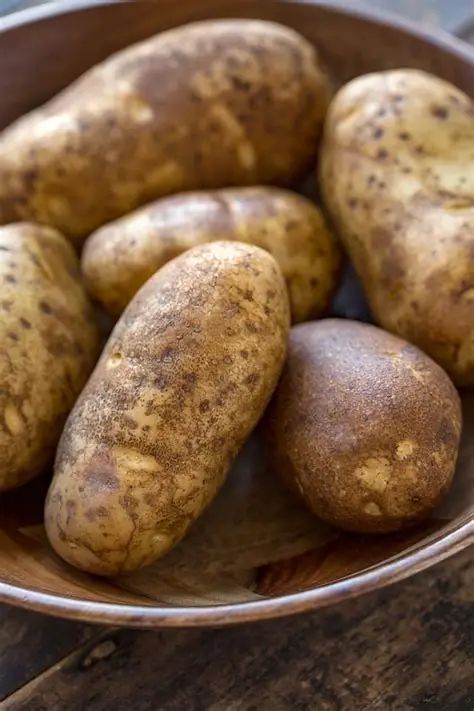
- 2 large Russet or Yukon Gold potatoes (about 1 lb total)
- 3 tablespoons neutral oil (canola, vegetable, or avocado oil work best)
- 2 tablespoons unsalted butter
- ½ teaspoon salt (or to taste)
- ¼ teaspoon black pepper
- Optional Flavor Boosters:
- 1 tablespoon finely grated onion
- ¼ teaspoon paprika or garlic powder
- 1 tablespoon chopped fresh chives or parsley
Equipment
- Box grater or food processor with a shredding disk
- Clean kitchen towel or several layers of cheesecloth
- Large bowl
- 10 or 12-inch non-stick or cast-iron skillet
Step-by-Step Instructions
Step 1: Prep the Potatoes
- Peel the potatoes. (You can leave the skin on for a more rustic feel, but peeling helps them stick together better).
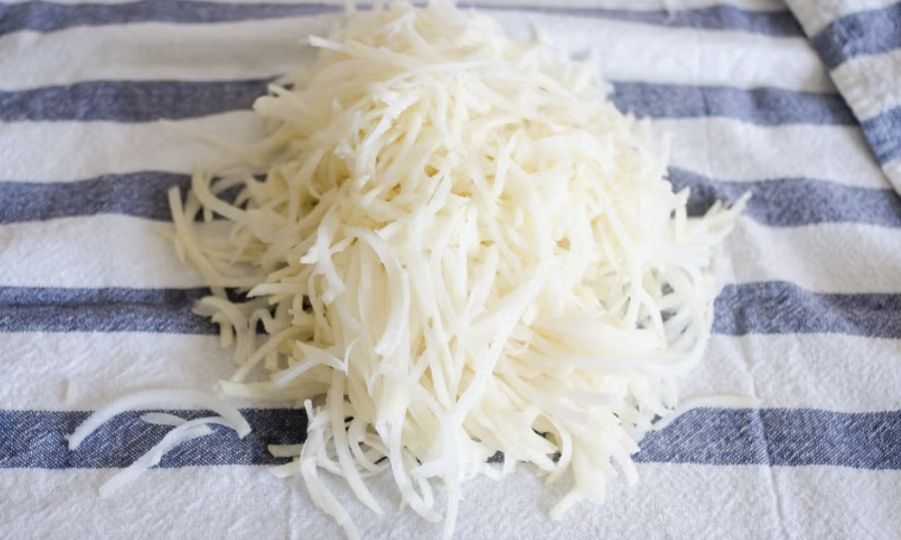
- Shred them using the large holes of a box grater or a food processor.
💡 Pro-Tip: If you have time, you can par-cook the whole, unpeeled potatoes (boil for 5-7 minutes or microwave for 3-4 minutes until just slightly tender). Let them cool, then shred. This gives a fluffier interior and makes them less prone to browning too quickly.
Step 2: The CRUCIAL Step – Remove Moisture
This is the most important step for crispiness!
- Place the shredded potato in the center of a clean kitchen towel.
- Gather the edges of the towel and twist it into a bundle over the sink.
- Squeeze with all your might! You will be amazed at how much starchy liquid comes out. Keep squeezing until no more moisture drips out.
💡 Pro-Tip: Rinsing the shredded potatoes in a bowl of cold water first can remove excess surface starch, which can make them gummy. After rinsing, drain and then wring them out in the towel. This is optional but leads to a more classic, lacy texture.
Step 3: Season the Potatoes
- Transfer the dry, squeezed potatoes to a dry bowl.
- Add the salt, pepper, and any other optional seasonings. Toss gently to combine evenly.
Step 4: Cook to Perfection

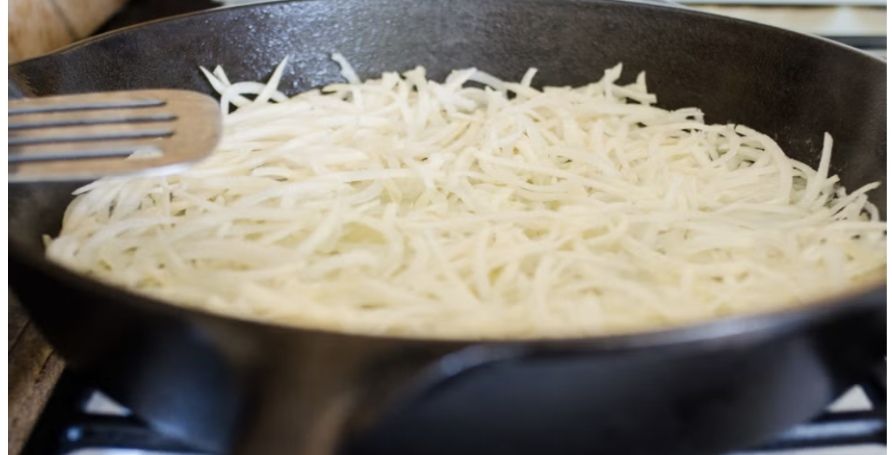
- In your skillet, heat the oil and butter together over medium-high heat. The butter adds flavor while the oil prevents burning.
- Once the butter is foaming and the oil is shimmering, add the shredded potatoes. Spread them out in an even layer, about ½-inch thick. Use a spatula to gently press them down.
- Let them cook undisturbed for 4-6 minutes. This is key to forming a good crust. Don’t peek too early!
Step 5: Flip and Finish
- When the bottom is a deep golden brown (lift an edge with the spatula to check), it’s time to flip.
- Here are two methods for flipping:
- The Confident Flip: If you’re feeling brave, flip the entire thing like a pancake.
- The Easy Way: Slide the hash browns onto a large plate. Place another plate upside down on top, invert it, and then slide the hash browns back into the skillet, uncooked side down.
- Press down gently again and cook for another 4-6 minutes on the second side, until golden brown and crispy.
Step 6: Serve Immediately
- Transfer the hash browns to a plate lined with a paper towel to absorb any excess oil for just a moment.
- Serve immediately while they are hot and crispy!
Tips for Hash Brown Success
- Don’t Crowd the Pan: Cook in two batches if you’re doubling the recipe. Overcrowding will steam the potatoes instead of frying them, leading to soggy results.
- Patience is a Virtue: Resist the urge to stir or move them around. Let that beautiful crust form.
- Keep Them Warm: If making a large batch, keep finished hash browns crispy on a wire rack set over a baking sheet in a 250°F (120°C) oven.
- Yukon Gold vs. Russet: Russets are the classic choice—high starch and low moisture make them extra crispy. Yukon Golds have a slightly waxier texture and buttery flavor, and they hold their shape a bit better.
Common Problems & Solutions
ProblemLikely CauseSolutionSoggy/Greasy Hash BrownsToo much moisture in the potatoes; oil not hot enough.Squeeze potatoes MORE. Ensure the oil is shimmering before adding potatoes.Hash Browns Fall ApartNot enough starch to bind them; didn’t press firmly.Don’t rinse the potatoes after shredding. Press down firmly in the pan to help them fuse.Burnt on the outside, raw insideHeat was too high.Cook over a steady medium-high heat, not maximum. The par-cook method also helps.
Enjoy your perfectly crispy, homemade classic hash browns! They’re the ultimate breakfast sidekick.
HOW TO MAKE CLASSIC YOGURT

Of course! Making classic, plain yogurt at home is a simple and rewarding process. It requires very little active effort and just a few ingredients. The key is maintaining a consistent, warm temperature for the bacteria to culture.
Here is a comprehensive guide to making classic yogurt.
The Ultimate Guide to Homemade Classic Yogurt

Yields: 1 Quart (4 Cups)
Prep time: 15 minutes
Inactive time: 4-12 hours
Cost: Significantly cheaper than store-bought!
Ingredients & Equipment
Ingredients:
- 1 Quart (4 cups) of Milk. (See “Choosing Your Milk” below)
- 2-3 tablespoons of Plain Yogurt with Live/Active Cultures (this is your “starter”). OR you can use a previous batch of your homemade yogurt.
Essential Equipment:
- A heavy-bottomed saucepan
- A reliable food thermometer (digital is best)
- A whisk
- A glass jar or container with a lid (like a 1-quart mason jar)
- An insulated cooler, yogurt maker, oven with a light, or a warm spot in your kitchen to maintain temperature.
Step-by-Step Instructions
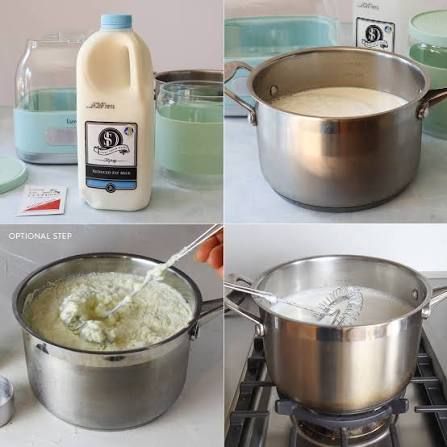
Step 1: Heat the Milk
- Pour the milk into the saucepan.
- Heat it over medium heat, stirring occasionally to prevent a skin from forming, until it reaches 180°F (82°C).
- Why? This step denatures the proteins in the milk, resulting in a thicker final yogurt and eliminating any competing bacteria.
Step 2: Cool the Milk
- Remove the pan from the heat and let the milk cool down to 110°F-115°F (43°C-46°C). You can place the pan in a cold water bath to speed this up.
- Why? If the milk is too hot, it will kill the yogurt cultures. If it’s too cool, the bacteria won’t activate properly.
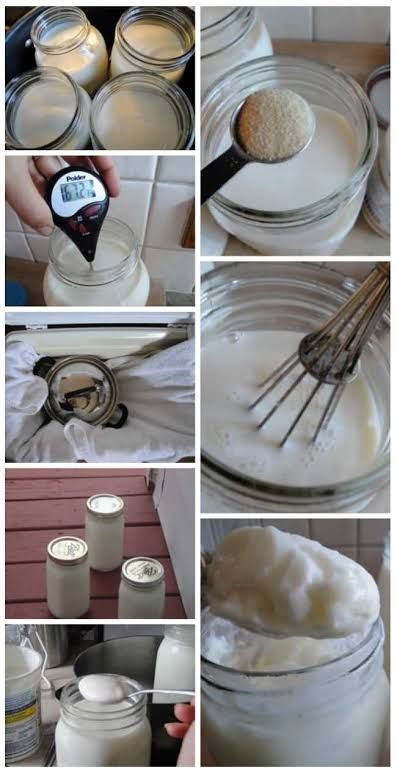
Step 3: Inoculate with Starter
- Once the milk is at the correct temperature, take a small amount of the warm milk and whisk it with your 2-3 tablespoons of store-bought yogurt starter in a separate bowl. This creates a smooth slurry.
- Whisk this slurry back into the main pot of warm milk until it’s fully incorporated.
Step 4: Incubate for Culturing
- Pour the inoculated milk into your clean glass jar(s) and cover with the lid.
- Now, the crucial part: keep it consistently warm (110°F/43°C) for 4-12 hours. Here are the most common methods:
- Yogurt Maker: Easiest method. Follow the manufacturer’s instructions.
- Oven with a Light: Turn on the oven light (not the oven itself). The bulb often generates enough warmth. Place the jar inside the oven.
- Cooler Method: Fill a cooler with warm water (about 110°F). Place the sealed jar inside, close the cooler lid, and let it sit. The water will stay warm for hours.
- “Off” Oven Method: Heat your oven to the lowest setting (e.g., 150°F), then TURN IT OFF. Let it cool for a few minutes, then place the jar inside.
- Instant Pot / Multi-Cooker: Most have a “Yogurt” function which is perfect for this.
- How long to incubate?
- 4-6 hours: Milder, less tart yogurt, and thinner.
- 8-12 hours: Tangier, thicker yogurt. The longer it cultures, the more tart it becomes and the more probiotics develop.
Step 5: Chill and Set
- Once the incubation time is up, your yogurt will still be warm and relatively liquid. Do not stir it!
- Place the jar directly into the refrigerator for at least 4-6 hours (or overnight). This cooling step stops the culturing process and allows the yogurt to fully set and thicken.
Tips for Perfect Yogurt
- Choosing Your Milk:
- Whole Milk: Creates the creamiest, richest, and thickest yogurt.
- 2% or Low-Fat Milk: Will result in a thinner, less creamy yogurt.
- Ultra-Pasteurized Milk: Works fine and can sometimes yield a thicker result without needing powdered milk.
- For Thicker Yogurt:
- Add Powdered Milk: Whisk in ½ cup of non-fat dry milk powder when you heat the milk.
- Strain it (Greek Yogurt): After chilling, line a strainer with cheesecloth or a coffee filter, place it over a bowl, and pour in the yogurt. Let it drain in the fridge for 1-4 hours depending on how thick you want it. The liquid that drains off is whey, which you can use in smoothies or baking!
- Your Starter Yogurt: Always use a fresh, plain store-bought yogurt with “Live & Active Cultures” listed on the label. The longer it cultures, the more tart it becomes and the more probiotics develop.
Troubleshooting Common Problems
ProblemLikely CauseSolutionYogurt is Thin/RunnyIncubation temperature was too low or time was too short; milk wasn’t heated high enough.Ensure milk hits 180°F. Check your incubation method maintains ~110°F. Culture longer next time. Strain it.Yogurt is GrainyMilk was overheated or the starter was mixed in at the wrong temperature.Use a thermometer to be precise.Yogurt Didn’t Set At AllStarter was dead (old yogurt); milk was too hot when starter was added.Use a fresh, new starter. Ensure milk is 110°F-115°F.Extremely Sour/Tart YogurtCultured for too long.Reduce incubation time next batch.
Enjoy the process and the incredible satisfaction of making your own classic, healthy yogurt! Once you master the basic method, you can experiment with different milks and incubation times to create your perfect batch.

Leave a comment