Recipe by :chef ssentongo
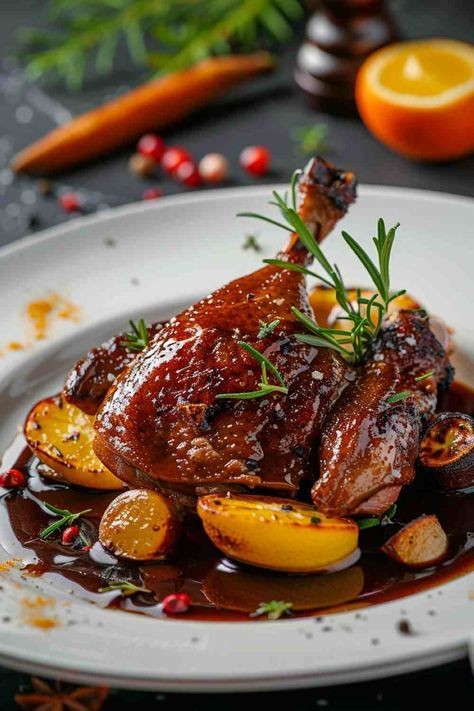
* > This is Duck Leg à l’Orange — crispy-skin duck legs in a sticky orange-gastrique sauce, with roasted potatoes and pink peppercorns. French bistro classic with a glossy, holiday vibe.
Duck Legs with Orange Glaze & Roasted Potatoes
Serves 2 | Time: 2.5 hours, mostly hands-off
1. Ingredients
For the Duck
- 2 whole duck legs, 300-350g each
- 1½ tsp kosher salt
- ½ tsp black pepper
- 1 tsp dried thyme
For the Orange Gastrique Sauce
- ½ cup sugar
- ¼ cup white wine vinegar
- 1 cup fresh orange juice, ∼2 oranges + zest of 1
- 1 cup chicken or duck stock
- 1 tbsp Grand Marnier or Cointreau, optional
- 1 tbsp cold butter
- Salt to taste
For the Sides & Garnish
- 300g baby potatoes, halved
- 1 tbsp duck fat or olive oil
- 1 orange, cut into wedges
- Fresh rosemary sprigs
- 1 tsp pink peppercorns, optional
- Flaky sea salt
2. Method
1. Cure duck: Pat legs dry. Score skin in crosshatch, don’t cut into meat. Rub with salt, pepper, thyme. Fridge uncovered 4-24 hours. This dries skin for max crisp.
2. Render + roast: Oven to 150°C. Cold pan, duck legs skin-side down. Medium-low heat 15-18 min to render fat. Fat should pool 0.5cm deep. Flip, pour off excess fat — save it for potatoes. Roast legs skin-up 1.5 hours until skin is deep mahogany and meat pulls from bone. Internal 85°C+.
3. Roast potatoes: Toss halved potatoes in 2 tbsp reserved duck fat, salt. Add to oven last 45 min with duck. Add orange wedges last 20 min to caramelize like the photo.
4. Gastrique: In small pot, melt sugar on medium until amber caramel, 4-5 min. Stand back, add vinegar — it’ll splatter. Stir until smooth. Add orange juice + zest + stock. Simmer 15 min until syrupy and coats spoon. Off heat, whisk in Grand Marnier + cold butter for shine. Salt to taste.
5. Crisp skin: Last 5 min, oven to 220°C or broil 2-3 min. Watch it — sugar in skin burns fast. You want glassy, not black.
6. Plate like the photo: Pool dark sauce on warm plate. Add potatoes + caramelized orange wedges. Duck leg on top, second leg leaning. Spoon more glaze over. Garnish with rosemary sprig, pink peppercorns, flaky salt.
3. Tips for the Photo Look
- Glassy skin: Uncovered fridge dry-brine + start in cold pan + high heat finish = lacquered, not rubbery. Score skin so fat renders out.
- Dark sauce: Caramel base makes it deep mahogany. If too light, reduce more. Strain for smooth, or leave zest bits for rustic.
- Caramelized orange: Roast wedges cut-side down in duck fat. They go golden and jammy like the photo.
- Pink peppercorns: Scatter 5-6 whole ones. They’re floral, not hot, and add that red pop.
- Height: Lean second leg against the first. Rosemary sprig vertical for drama.
- Potatoes: Halve small Yukons. Crisp cut-side in duck fat. Golden edges = texture contrast.
4. Key Notes
Rubbery skin: Didn’t render fat long enough, or started in hot pan. Cold pan + low heat = fat melts before skin sets. Need 15+ min.
Sauce bitter: Burnt the caramel. Sugar goes from amber to black in 30 sec. Pull it at deep golden, not dark brown.
Sauce too sharp: Vinegar still harsh. Reduce longer, or add 1 tsp honey. Gastrique should be sweet-tart, not sour.
Duck dry: Overcooked or no fat cap. Legs need 85°C+ to break down collagen — undercooked is actually tougher. Cook time, not temp, matters for legs.
No Grand Marnier: Skip it or use 1 tsp orange zest extra. It’s just for aroma.
5. Why This Works
Duck is fatty, rich meat that begs for acid + sweet to cut it — classic French pairing. Scoring + cold-pan rendering gets rid of thick subcutaneous fat so skin crisps instead of going flabby. Long slow roast breaks down tough leg collagen into gelatin. Gastrique is caramel + vinegar + fruit: sweet, sour, bitter balance. Duck stock makes sauce taste like duck, not generic orange sauce. Butter finish = French “monter” for gloss and body. Potatoes roasted in duck fat pick up savory flavor. Pink peppercorns add color + light floral heat without capsaicin burn.
Drink pairing: Pinot Noir, Beaujolais, or off-dry Gewürztraminer. Fruit matches orange, acid cuts fat.
Make ahead: Confit duck legs day before in their fat. Crisp to order. Sauce keeps 3 days.
Want a quick pan-sauce version with duck breast instead, or how to make duck confit the traditional way?
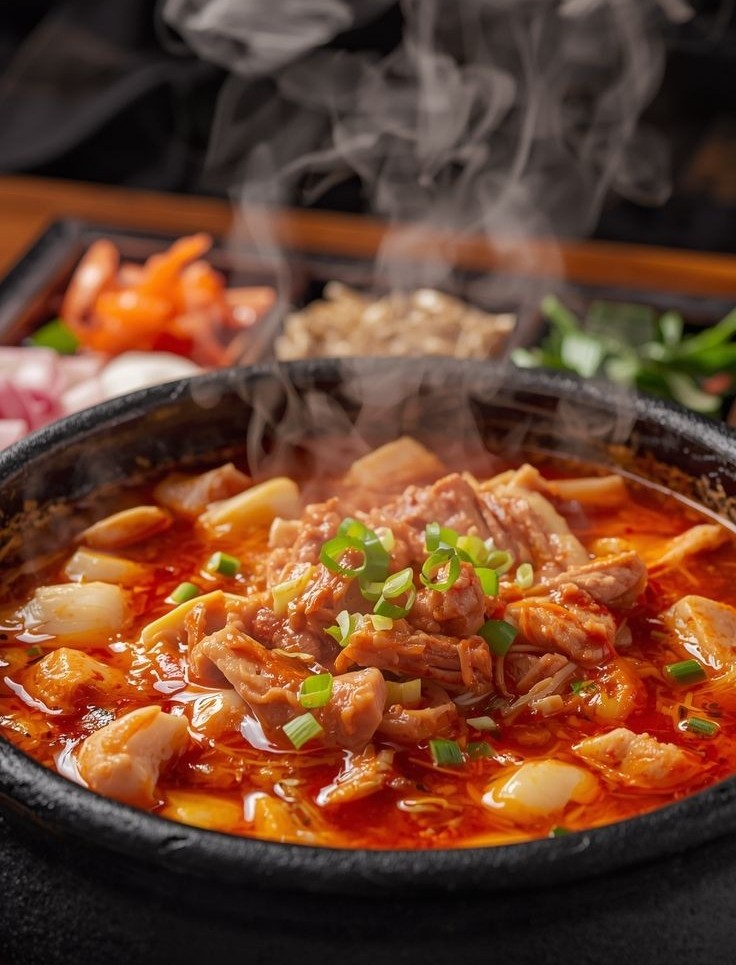
* > KIMCHI JJIGAE – PORK & KIMCHI STEW
Serves 2-3 | Time: 35 min
1. Ingredients
For the Stew
- 1 tbsp sesame oil + 1 tbsp vegetable oil
- 200g pork belly or pork shoulder, thinly sliced
- 2 cups aged kimchi, 3+ weeks old, chopped + ¼ cup kimchi brine
- ½ onion, sliced
- 2 garlic cloves, minced
- 1 tbsp gochugaru, Korean chili flakes
- 1 tbsp gochujang, Korean chili paste
- 1 tsp soy sauce, 1 tsp sugar
- 2½ cups anchovy stock or water + 1 tsp dashi powder
- 200g firm tofu, cubed 2cm
- 2 green onions, sliced, whites and greens separated
Optional Add-ins
- ½ cup rice cakes, tteok
- 100g enoki or oyster mushrooms
- 1 tsp fish sauce, for extra umami
2. Method
1. Fry pork + kimchi: In ttukbaegi or heavy pot, heat both oils on medium-high. Add pork, cook 3-4 min until fat renders. Add aged kimchi, onion, white parts of green onion, garlic. Stir-fry 5 min. Old kimchi is key — it should be sour and funky. Frying it develops depth.
2. Build flavor: Stir in gochugaru + gochujang + soy sauce + sugar. Fry 1 min until paste smells toasty. This blooms the chili and removes raw taste.
3. Simmer: Pour in kimchi brine + stock. Bring to boil, then simmer 15 min uncovered. Broth reduces and concentrates. Taste — add fish sauce if it needs more savory depth.
4. Tofu + finish: Add tofu cubes and rice cakes if using. Simmer 5 min more. Tofu soaks up broth, rice cakes go chewy. Don’t stir hard or tofu breaks.
5. Serve boiling: Top with green parts of green onion. Serve directly in ttukbaegi or transfer to bowls. It should still be bubbling at the table like the photo.
3. Tips for the Photo Look
- Ttukbaegi: Korean earthenware pot holds heat and keeps stew bubbling. Cast iron works too. Pre-heat the pot before serving for that steam effect.
- Red oil slick: That glossy red oil on top comes from frying kimchi + pork fat + gochugaru. Don’t skim it — it’s flavor and looks amazing.
- Aged kimchi: Fresh kimchi makes watery, bland jjigae. You want sour, deep-red, soft kimchi. The older the better.
- Pork placement: Arrange some pork slices on top after cooking for the photo. Spoon broth over so it looks abundant.
- Green onion curls: Slice greens thin on bias. Drop in ice water 5 min for curls like the photo.
- Banchan sides: That tray in back is kimchi, pickled radish, beansprouts. Jjigae always comes with banchan and rice.
4. Key Notes
Not spicy enough: Add ½ tbsp more gochugaru or 1 tsp Korean hot pepper. Jjigae should make your nose run a little.
Too sour: Kimchi was extra aged, or too much brine. Add ½ tsp more sugar or ½ cup more stock to balance.
Watery broth: Didn’t fry kimchi long enough, or skipped gochujang. Simmer uncovered to reduce. Should be rich, not soup-like.
No pork belly: Use canned tuna, mackerel, or mushrooms for vegetarian. Spam works too — very Korean.
No anchovy stock: Use water + 1 tsp dashi powder, or chicken stock. Anchovy adds depth but isn’t required.
5. Why This Works
Aged kimchi is the whole point — fermentation creates lactic acid for sourness and glutamates for umami. Frying kimchi with pork fat mellows sharpness and adds body. Gochugaru brings fruity heat, gochujang adds fermented sweet-spicy depth. Pork belly fat carries flavor and makes the broth rich. Tofu is neutral protein that soaks up the spicy broth. Simmering concentrates everything. Sugar isn’t to make it sweet — it balances the sour + heat. Green onion at the end adds fresh bite to cut richness.
How to eat: Serve with bowl of hot rice. Spoon broth over rice, or dip rice into stew. Kimchi jjigae + rice + cold beer = peak Korean comfort meal.
Traditional additions: Add 1 slice of American cheese on top right before serving — it melts into the broth. Sounds weird, tastes amazing. Or crack an egg into the bubbling pot at the end.
Want a vegetarian version with mushrooms, or how to make anchovy stock from scratch for deeper flavor?
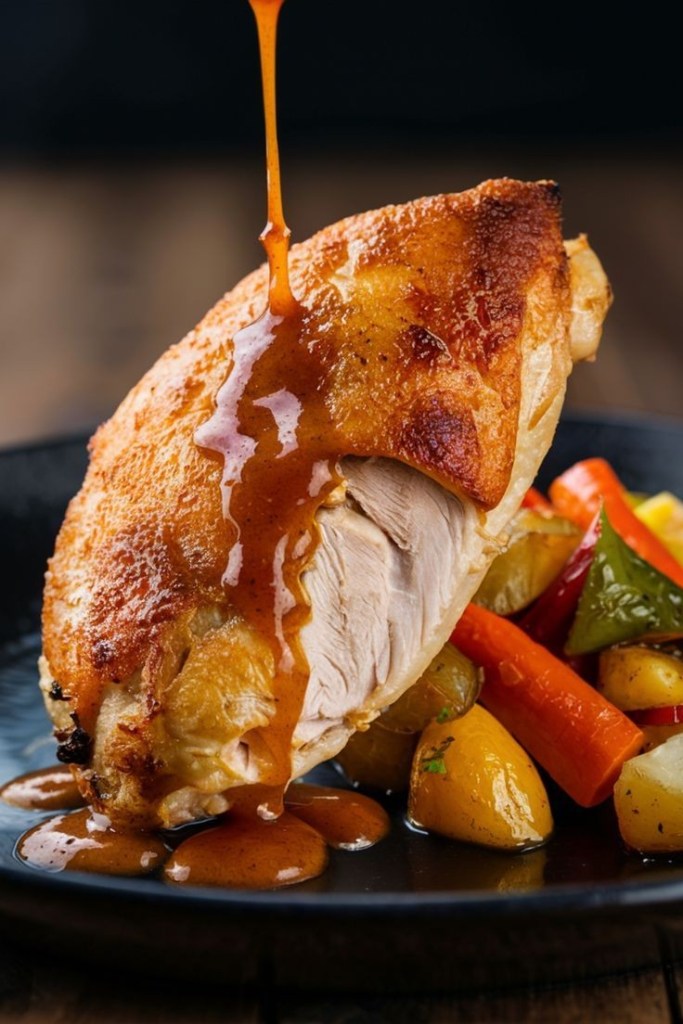
* > This is Roasted Chicken Breast with Pan Gravy — golden, crispy-skinned breast propped on roasted root veg, with that glossy brown gravy pour. Looks like a steakhouse chicken, but it’s all technique.
Roast Chicken Breast with Herb Gravy & Root Vegetables
Serves 2 | Time: 50 min
1. Ingredients
For the Chicken
- 2 bone-in, skin-on chicken breasts, 350-400g each
- 1½ tsp kosher salt
- ½ tsp black pepper, ½ tsp paprika
- 1 tbsp olive oil
- 2 tbsp butter
- 2 garlic cloves, smashed
- 2 sprigs thyme or rosemary
For the Roasted Veg
- 300g baby potatoes, halved
- 2 large carrots, cut into batons
- 1 bell pepper, red or green, chunked
- 1 tbsp olive oil, salt, pepper
For the Pan Gravy
- 1 tbsp butter + 1 tbsp flour
- 1 cup chicken stock
- 1 tsp Dijon mustard
- 1 tsp soy sauce, for color + umami
- ½ tsp dried thyme
- Pan drippings from chicken
2. Method
1. Dry brine chicken: Pat breasts dry. Salt all over, especially under skin. Fridge uncovered 1 hour or overnight. This = crispy skin. Let sit at room temp 20 min before cooking.
2. Roast veg: Oven to 220°C. Toss potatoes, carrots, peppers with oil, salt, pepper. Spread on sheet pan. Roast 35-40 min, tossing once, until golden and tender.
3. Sear chicken: Oven to 200°C. Cast iron or oven-safe pan on medium-high. Oil pan. Chicken skin-side down, 5-6 min until deep golden. Don’t move it. Flip, add butter + garlic + herbs. Baste 1 min.
4. Roast: Transfer pan to oven. Roast 15-18 min until 70°C internal. Baste once halfway. Rest 10 min on board. Temp rises to 74°C.
5. Pan gravy: Same pan, medium heat. Spoon off all but 1 tbsp fat. Whisk in flour, cook 1 min. Slowly whisk in stock. Add Dijon, soy, thyme. Simmer 3-4 min until thick and glossy. Strain for smooth or keep rustic. Taste for salt.
6. Plate like the photo: Mound veg on dark plate. Lean sliced chicken breast against veg, skin up. Pour hot gravy over top so it cascades down the cut face.
3. Tips for the Photo Look
- Crispy skin: Dry brine + hot pan + don’t crowd. Moisture is the enemy. Pat skin bone-dry before searing.
- Bone-in, skin-on: Boneless breasts dry out. Bone insulates, skin self-bastes. That’s how you get juicy like the photo.
- Angle the breast: Carve breast off bone in one piece, then stand it up on the veg. Slice face forward for that juicy cross-section.
- Gravy pour shot: Gravy should be nappe — thick enough to coat spoon but still pourable. Reheat right before plating.
- Color contrast: Dark plate makes golden skin + brown gravy + orange carrots pop. White plate washes it out.
- Herb oil: Toss veg with chopped parsley after roasting for green flecks like the photo.
4. Key Notes
Dry chicken: Overcooked or used boneless breasts. Pull at 70°C. Carryover cooks it to 74°C. Resting is non-negotiable — keeps juices in.
Flabby skin: Didn’t dry brine, pan not hot enough, or you steamed it. Uncovered fridge time pulls moisture from skin.
Pale gravy: No fond in pan, or skipped soy sauce. Scrape up browned bits after roasting — that’s flavor. Soy adds color without tasting like soy.
Lumpy gravy: Added stock too fast to roux. Whisk stock in slowly. If lumpy, strain or blitz with immersion blender.
Veg underdone: Cut carrots too thick. Keep all veg similar size. Parboil potatoes 5 min first if you want extra crispy.
5. Why This Works
Bone-in breast cooks slower than boneless, so skin has time to crisp before meat overcooks. Dry brining seasons deep and dries skin for Maillard browning. Searing first builds fond = gravy base. Basting with butter + herbs adds flavor and keeps skin from drying. Pan gravy uses that fond + roux for body. Dijon adds tang, soy adds umami + color. Roasting veg at high heat caramelizes natural sugars. Propping chicken on veg keeps skin out of the sauce so it stays crisp for the photo and the bite.
Drink pairing: Chardonnay, Viognier, or light Pinot Noir. White cuts richness, red matches roast flavors.
Make ahead: Brine chicken day before. Gravy can be made from stock alone if you skip pan drippings.
Want a whole roast chicken version using the same method, or how to make it with boneless breasts without drying out?


Leave a comment