Tag: 1

  • Home – Easy Recipes – Dishes – Cooking Guide

    HOW TO MAKE BAKED CAESAR CHICKEN WITH PARMESAN AND CREAM SAUCE

    Recipe by : chef ssentongo

    This Baked Caesar Chicken with a creamy Parmesan sauce is a fantastic, restaurant-quality dish that’s surprisingly easy to make at home. It’s rich, flavorful, and perfect for a comforting weeknight dinner or for impressing guests.

    Here is a detailed, step-by-step guide to creating this delicious meal.

    The Allure of Baked Caesar Chicken

    • Creamy & Cheesy: The sauce is incredibly rich and velvety.
    • Packed with Flavor: Caesar dressing, garlic, and Parmesan create a powerful, savory punch.
    • Incredibly Tender: Baking the chicken breasts in the sauce keeps them juicy and moist.
    • One-Pan Wonder: Minimal cleanup is a huge win!

    Gather Your Ingredients

    (Serves 4)

    For the Chicken:

    • 4 boneless, skinless chicken breasts (about 1.5 – 2 lbs total)
    • 1 tablespoon olive oil
    • 1 teaspoon Italian seasoning
    • Salt and freshly ground black pepper, to taste

    For the Creamy Caesar Parmesan Sauce:

    • 1 cup (about 240ml) heavy cream (or half-and-half for a slightly lighter version)
    • ½ cup (about 120ml) Caesar dressing (creamy, not oily vinaigrette style)
    • ½ cup freshly grated Parmesan cheese, plus more for garnish
    • 2 cloves garlic, minced
    • 1 teaspoon Dijon mustard (optional, adds depth)
    • ½ cup shredded mozzarella cheese (for the top)

    For Garnish:

    • Fresh chopped parsley
    • Extra grated Parmesan cheese
    • Croutons (optional, for crunch)

    Step-by-Step Instructions

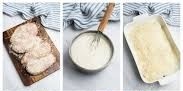
    Step 1: Prepare the Chicken

    1. Preheat your oven to 375°F (190°C).
    2. Pat the chicken breasts completely dry with paper towels. This helps with browning.
    3. If your chicken breasts are very thick or uneven, place them between two pieces of plastic wrap and gently pound them to an even thickness (about ¾-inch thick). This ensures they cook evenly.
    4. Drizzle the chicken with olive oil and rub it all over. Season both sides generously with salt, pepper, and Italian seasoning.

    Step 2: Make the Creamy Sauce

    1. In a medium bowl, whisk together the heavy cream, Caesar dressing, ½ cup of grated Parmesan, minced garlic, and Dijon mustard (if using) until well combined. The sauce might look a little separated at first, but it will come together beautifully in the oven.

    Step 3: Assemble in the Baking Dish

    1. Choose a baking dish just large enough to hold the chicken breasts in a single layer without too much extra space. A 9×13-inch dish usually works well.
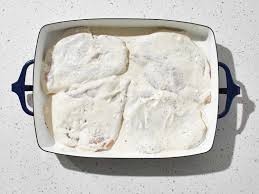
    2. Place the seasoned chicken breasts in the dish.
    3. Pour the creamy Caesar sauce evenly over the chicken, making sure each piece is covered.

    Step 4: Bake to Perfection

    1. Cover the baking dish tightly with aluminum foil. This traps steam and ensures the chicken cooks through without drying out.
    2. Bake in the preheated oven for 20 minutes.
    3. Remove the dish from the oven and carefully take off the foil. The chicken should be mostly cooked through at this point.
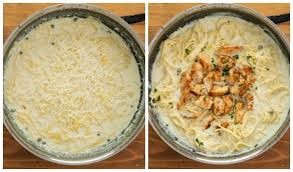
    4. Sprinkle the shredded mozzarella cheese evenly over the top of the chicken.
    5. Return the dish to the oven, uncovered, and bake for another 10-15 minutes, or until the cheese is melted and bubbly, and the internal temperature of the chicken reaches 165°F (74°C) on an instant-read thermometer.

    Step 5: Rest and Serve

    1. Once out of the oven, let the chicken rest in the pan for 5-10 minutes. This allows the juices to redistribute throughout the meat, making it even more tender.
    2. Garnish with fresh parsley and an extra sprinkle of Parmesan cheese.

    Serving Suggestions

    This rich chicken dish pairs wonderfully with:

    • Pasta: Serve it over a bed of fettuccine, linguine, or penne to soak up all that incredible sauce.
    • Mashed Potatoes: Creamy mashed potatoes are a classic and comforting base.
    • Rice: Jasmine or long-grain white rice works perfectly.
    • Vegetables: Roasted asparagus, broccoli, or a simple green salad with a light vinaigrette to balance the richness.

    Chef’s Tips & Tricks for Success

    • Don’t Skip the Pounding: Pounding the chicken to an even thickness is the #1 secret to preventing dry, overcooked edges and undercooked centers.
    • Use Fresh Parmesan: Pre-grated Parmesan often contains anti-caking agents that can make the sauce grainy. Grating your own from a block of Parmesan will give you a much smoother, more flavorful sauce.
    • Choose the Right Dressing: A creamy, classic Caesar dressing (like Ken’s Steakhouse, Cardini’s, or Marie’s) works best. Avoid a thin, oily vinaigrette-style Caesar.
    • Sauce Too Thin? If you prefer a thicker sauce, you can create a quick slurry. Mix 1 teaspoon of cornstarch with 1 tablespoon of cold water. After baking, remove the chicken and whisk the slurry into the hot sauce in the pan. Place it back on the stovetop over medium heat for 1-2 minutes, stirring constantly, until thickened.
    • Add Bacon: For an extra layer of flavor, sprinkle cooked, crumbled bacon over the top before serving.

    Enjoy your delicious, homemade Baked Caesar Chicken! It’s sure to become a new family favorite.

    #easyrecipe09 #easyrecipe06 #easyrecipe006

  • Home – Easy Recipes – Dishes – Cooking Guide

    HOW TO CALCULATE FOOD COST

    By: chef ssentongo

    Of course! Calculating food cost is a fundamental skill for anyone in the food service industry, from restaurant owners to home cooks looking to budget. Here’s a comprehensive guide broken down into simple steps.

    The Two Main Calculations: Food Cost Percentage & Plate Cost

    There are two primary ways to calculate food cost: as a percentage (for overall business health) and as a per-plate cost (for pricing individual menu items).


    Part 1: Calculating Your Overall Food Cost Percentage

    This is a macro-level look at how much of your revenue is spent on food ingredients over a specific period (e.g., a week or a month). It’s a key metric for profitability.

    The Formula:
    Food Cost % = (Beginning Inventory + Purchases – Ending Inventory) / Total Food Sales

    Step-by-Step Breakdown:

    1. Determine Your “Beginning Inventory” Value ($)
      · This is the dollar value of all the food in your kitchen at the start of the period (e.g., on the 1st of the month).
      · You must do a physical count of every item and multiply it by its purchase cost.
    2. Add Your “Purchases” Value ($)
      · This is the total amount you spent on food supplies during that same period. Pull this number from your invoices or accounting software.
    3. Determine Your “Ending Inventory” Value ($)
      · At the end of the period, do another physical count of all the food in your kitchen. This is your ending inventory.
    4. Calculate Your “Cost of Goods Sold” (CoGS)
      · This is the actual value of the food you used during the period.
      · CoGS = Beginning Inventory + Purchases – Ending Inventory
      · Example: You started with $10,000 in food, bought $5,000 more, and ended with $8,000. Your CoGS is: $10,000 + $5,000 – $8,000 = $7,000.
    5. Find Your “Total Food Sales” ($)
      · This is the total revenue generated from food only (exclude alcohol, merchandise, etc.) during that period. Get this from your point-of-sale (POS) system.
    6. Plug the Numbers into the Formula
      · Food Cost % = CoGS / Total Food Sales
      · Example: Your CoGS was $7,000 and your Food Sales were $25,000.
      · $7,000 / $25,000 = 0.28
      · Multiply by 100 to get a percentage: 0.28 x 100 = 28%

    What’s a Good Food Cost Percentage?

    · Full-Service Restaurants: 28-35%
    · Fast-Casual/Restaurants: 25-30%
    · Pizza Places: Can be as low as 20-25% due to low-cost ingredients.
    · Bars: Focus on liquor cost, which is typically 15-20%.

    A percentage that is too high means you’re not pricing your menu correctly or are losing money to waste, theft, or poor portioning. A percentage that is too low might mean your prices are too high, which could scare away customers.


    Part 2: Calculating Plate Cost (Cost per Menu Item)

    This is a micro-level calculation to determine the exact cost to make one single serving of a menu item. This is essential for setting prices.

    The Formula:
    Plate Cost = Sum of Costs for All Ingredients in a Single Serving

    Step-by-Step Breakdown:

    1. List Every Ingredient in the dish. Be precise. This includes oil, butter, spices, and garnishes.
      · Example: Burger with Fries:
      · Burger bun
      · Ground beef patty
      · Cheese slice
      · Lettuce
      · Tomato slice
      · Onion slice
      · Condiments (ketchup, mayo)
      · Side of fries
      · Oil for cooking
    2. Calculate the Cost of Each Ingredient.
      · You rarely buy one tomato or a single gram of mayo. You buy in bulk. You need to find the cost of the unit you use.
      · Formula: Ingredient Cost = (Purchase Price / Total Unit Size) x Recipe Amount
      · Example for Ground Beef:
      · You buy a 5kg case of ground beef for $50.
      · Your burger patty is 150g.
      · First, find the cost per gram: $50 / 5000g = $0.01 per gram
      · Then, multiply by the amount used: $0.01/g x 150g = $1.50 for the patty.
    3. Account for Waste and Trim.
      · If you buy a whole head of lettuce for $2 and after trimming, you only get 80% usable product, your usable cost for lettuce is higher.
      · Adjusted Cost = Purchase Price / Usable Yield
      · $2.00 / 0.80 = $2.50. Now you use this $2.50 value to calculate the cost of the shreds you put on the burger.
    4. Add Up All the Ingredient Costs.
      · Create a spreadsheet. For the burger example:
      · Bun: $0.35
      · 150g Beef Patty: $1.50
      · Cheese: $0.40
      · Lettuce, Tomato, Onion: $0.45
      · Condiments: $0.15
      · Fries: $0.75
      · Total Plate Cost = $0.35 + $1.50 + $0.40 + $0.45 + $0.15 + $0.75 = $3.60
    5. Price Your Menu Item.
      · A common pricing method is to use your Target Food Cost Percentage.
      · Ideal Menu Price = Plate Cost / Target Food Cost %
      · Example: If your target food cost is 30%, your burger price should be: $3.60 / 0.30 = $12.00.
      · You should also check competitor prices to ensure your price is market-appropriate.

    Why This Is So Important (& Common Causes of High Food Cost)

    · Profitability: This is the difference between success and failure.
    · Pricing: Allows you to set intelligent, profitable prices.
    · Identifying Problems: A high percentage flags issues like:
    · Food Waste: Over-prepping, spoilage, poor storage.
    · Theft: Both by staff and customers.
    · Inconsistent Portioning: Kitchen staff giving away too much food.
    · Inefficient Recipes: Menu items that are too expensive to make.
    · Supplier Prices: Rising costs from your vendors that you haven’t accounted for.

    Pro Tips for Lowering Your Food Cost

    1. Portion Control: Use scales, scoops, and ladles to ensure every plate is identical.
    2. Track Waste: Implement a waste log to see what gets thrown out and why.
    3. Negotiate with Suppliers: Build relationships and shop around for better prices.
    4. Design a Smart Menu: Feature dishes with low-cost, high-profit ingredients and use cross-utilization (using the same ingredient in multiple dishes to reduce waste).
    5. Conduct Regular Inventory Checks: You can’t manage what you don’t measure. Weekly counts are best practice.

    By mastering these calculations, you move from guessing to making informed, profitable decisions for your food business.

    3 FOOD COST RULES

    Of course. Here are 3 fundamental, non-negotiable rules for controlling food cost, explained for anyone from a restaurant owner to a line cook.


    Rule #1: You Can’t Manage What You Don’t Measure

    This is the golden rule of food cost. Intuition and guesswork will lose you money.

    · What it means: Every single ingredient that enters your kitchen must be tracked, from a case of prime rib to a single lemon. This is done through consistent, scheduled inventory counts.
    · How to do it:

    1. Count Everything: Once a week (or at least once a month), do a full physical count of every item in your walk-in, freezer, and dry storage.
    2. Track Purchases: Keep every invoice and log all food purchases during that period.
    3. Calculate Your Food Cost Percentage: Use the formula:
      (Beginning Inventory + Purchases – Ending Inventory) / Food Sales = Food Cost %
      · Why it works: This process reveals your true Cost of Goods Sold (CoGS). Without it, you’re flying blind. A rising food cost percentage is a direct signal that you have a problem with waste, theft, or portioning that you need to investigate.

    Rule #2: Perfect Portioning is Profit

    Inconsistent portions are a silent killer of profitability. Giving away “a little extra” on every plate adds up to a lot of lost revenue over a year.

    · What it means: Every ingredient in every dish must be measured precisely, every time. This applies to a sprinkle of grated cheese, a scoop of fries, and a ladle of sauce just as much as it does to the main protein.
    · How to do it:

    1. Use Tools: Equip your kitchen with scales, scoops, ladles, and portioning tools. A digital scale is your best friend.
    2. Create Spec Sheets: Have a photo and detailed recipe for every menu item that lists the exact weight or volume of each component.
    3. Train and Enforce: Train every cook on these standards and make adherence part of the kitchen culture. A 7-ounce portion of salmon is not 6.5 ounces and not 7.5 ounces.
      · Why it works: Consistent portioning ensures your Plate Cost (the cost to make one menu item) remains stable and predictable. This allows you to set an accurate price and guarantee the same profit margin on every single order that goes out the pass.

    Rule #3: Waste is Theft (Track It and Attack It)

    Food that ends up in the trash bin is literally money you are throwing away. Managing waste is not just about being “green”; it’s a direct financial imperative.

    · What it means: You must treat wasted food with the same seriousness as you would stolen cash from the register. The goal is to identify why waste is happening and systematically eliminate those reasons.
    · How to do it:

    1. Use a Waste Log: Keep a clipboard or notebook in the kitchen. Any time food is thrown out, the staff must log it: what was thrown out, how much, why, and who did it.
    2. Analyze the Log: Common reasons will emerge:
      · Spoilage: You’re over-ordering or not storing properly.
      · Trim/Prep Waste: Your recipes aren’t using ingredients efficiently.
      · Kitchen Mistakes: Burnt, dropped, or incorrectly made food.
      · Over-Prepping: You cooked too much and it died on the line.
    3. Act on the Data: Use the log to fix the root causes—adjust order quantities, improve storage, train staff, or redesign menus to use trim (e.g., using vegetable scraps for stock).
      · Why it works: A waste log makes an invisible cost visible. It holds the team accountable and turns waste reduction from a vague concept into a concrete, solvable problem. Attacking waste directly protects your bottom line.

    In short: Measure your inventory, control your portions, and track your waste. Master these three rules, and you master your food cost.

  • Home – Easy Recipes – Dishes – Cooking Guide

    By: chef ssentongo

    30 Side Hustles Great Cooks and Chefs Can Start for Extra Cash

    Here’s a curated list of 30 side hustles for cooks and chefs to earn extra income, combining culinary skills with entrepreneurial opportunities. These ideas are sourced from industry experts, gig economy platforms, and successful food entrepreneurs .


    1. Sell Food Products

    • What: Homemade jams, sauces, baked goods, or spice blends.
    • Where: Farmers’ markets, Etsy, or local grocery stores.
    • Tip: Check local health regulations for home kitchens .

    2. Private Chef Services

    • What: Cook personalized meals for families or events.
    • Earnings: $25–$40/hour. Use platforms like Miummium or HireAChef .

    3. Meal Prep Delivery

    • What: Prepare weekly meals for busy clients (e.g., keto, vegan).
    • Profit: $20–$40/hour. Market at gyms or via Instagram .

    4. Catering for Events

    • What: Small weddings, corporate lunches, or dinner parties.
    • Scale: Start with drop-off service; expand to full-service .

    5. Food Truck or Pop-Up

    • What: Mobile or temporary dining with a focused menu.
    • Cost: $50K–$100K startup (truck) or lower for pop-ups .

    6. Virtual Cooking Classes

    • What: Teach techniques via Zoom or YouTube.
    • Platforms: Udemy, Skillshare, or self-hosted .

    7. Food Blogging/YouTube

    • What: Share recipes or reviews. Monetize via ads, sponsorships, or cookbooks.
    • Earnings: $1K–$10K/month with 10K+ followers .

    8. Farmers’ Market Vendor

    • What: Sell artisanal bread, pickles, or ready-to-eat items.
    • Profit: $10K–$30K/year part-time .

    9. E-Cookbook Author

    • What: Self-publish niche recipe books (e.g., gluten-free, air fryer).
    • Platforms: Amazon KDP or Shopify for direct sales .

    10. Food Photography

    • What: Shoot dishes for restaurants or bloggers.
    • Gear: Start with a smartphone and natural light .

    11. Food Styling

    • What: Plate dishes for photoshoots or ads.
    • Clients: Magazines, brands, or social media influencers .

    12. Recipe Developer

    • What: Create recipes for brands, blogs, or meal kits.
    • Earnings: $50–$200/recipe .

    13. Specialty Coffee Cart

    • What: Sell cold brew or espresso at events.
    • Cost: $2K–$10K startup .

    14. Home-Based Bakery

    • What: Sell cakes, cookies, or bread.
    • Legal: Verify cottage food laws in your state .

    15. Food Subscription Boxes

    • What: Curate themed boxes (e.g., global snacks, baking kits).
    • Platform: Cratejoy or Shopify .

    16. Food Critic

    • What: Review restaurants for blogs or local media.
    • Start: Build a portfolio with unpaid reviews .

    17. Culinary Tour Guide

    • What: Host food tours in your city (virtual or in-person).
    • Revenue: $50–$100/person .

    18. Food Truck Consultant

    • What: Advise new owners on menus, permits, or branding.
    • Fee: $50–$150/hour .

    19. Fermented Foods Business

    • What: Sell kombucha, kimchi, or sourdough starters.
    • Market: Health stores or online .

    20. Food Podcast

    • What: Discuss industry trends or interview chefs.
    • Monetize: Sponsorships or Patreon .

    21. Temporary Line Cook

    • What: Fill shifts at understaffed restaurants via apps like Qwick .

    22. Food-Themed Merch

    • What: Sell aprons, knives, or recipe-themed art on Etsy .

    23. Ice Cream Cart

    • What: Seasonal hustle with unique flavors (vegan options sell well!) .

    24. Food Safety Auditor

    • What: Inspect kitchens remotely for compliance.
    • Certification: Needed (e.g., ServSafe) .

    25. Cookbook Editor

    • What: Proofread or test recipes for authors .

    26. Food Waste Consultant

    • What: Help restaurants reduce waste and save costs .

    27. Virtual Meal Planner

    • What: Design weekly menus for clients.
    • Tools: Use Canva or Google Docs .

    28. Food Truck Franchise

    • What: License a proven concept (e.g., tacos, BBQ).
    • Example: The Dumpling Lady (started as a truck, now a brick-and-mortar) .

    29. Food Influencer

    • What: Partner with brands (e.g., cookware, groceries).
    • Platforms: Instagram, TikTok .

    30. Airbnb Experience Host

    • What: Offer cooking classes or dinner parties in your home .

    Key Takeaways

    • Low-Cost Startups: Home bakeries, blogging, or farmers’ markets .
    • High Earnings: Private cheffing, catering, or food trucks .
    • Trending: Virtual classes, meal kits, and sustainability-focused hustles .

    For deeper dives, explore Escoffier’s culinary entrepreneurship guide or Shopify’s food business tips . Let me know if you’d like help tailoring a hustle to your skills!

    20 Advanced Cooking Techniques for Every Chef

    20 Advanced Cooking Techniques Every Chef Should Master

    These skills will elevate your dishes from good to extraordinary, whether you’re a professional chef or a serious home cook.


    1. Sous Vide Precision Cooking

    • What: Cook vacuum-sealed food in a temperature-controlled water bath for perfect doneness.
    • Use: Steaks (129°F/54°C for medium-rare), eggs (167°F/75°C for custard-like yolks).
    • Pro Tip: Finish with a sear for texture.

    2. Spherification (Molecular Gastronomy)

    • What: Turn liquids into caviar-like spheres using sodium alginate + calcium chloride.
    • Use: Cocktail “pearls,” balsamic vinegar bursts.

    3. Dry-Aging Meat

    • What: Hang beef in a controlled environment (34°F/1°C, 75% humidity) for 30+ days.
    • Result: Concentrated flavor, tender texture.
    • DIY: Use a mini fridge with a salt block and fan.

    4. Fermentation Mastery

    • What: Harness microbes to transform ingredients (kimchi, sourdough, koji).
    • Key: Control salt levels (2–5% by weight) and temperature.

    5. Emulsification Without Stabilizers

    • What: Bind oil and water into stable sauces (mayonnaise, hollandaise).
    • Trick: Add oil slowly while whisking vigorously.

    6. Confit (Slow-Cooked in Fat)

    • What: Submerge proteins (duck, garlic) in fat and cook low and slow.
    • Temp: 180–200°F (82–93°C) for tender, flavorful results.

    7. Dehydration for Texture

    • What: Remove moisture to intensify flavors (fruit leathers, mushroom powder).
    • Tools: Dehydrator or oven at 140°F/60°C.

    8. Reverse Searing

    • What: Slow-roast steak first, then sear for a perfect crust.
    • Best for: Thick cuts like ribeye.

    9. Smoking (Hot vs. Cold)

    • Hot Smoke: 225°F/107°C for BBQ.
    • Cold Smoke: Below 85°F/29°C for salmon or cheese.

    10. Gelification (Agar, Gelatin, Pectin)

    • What: Create edible gels (panna cotta, fruit gels).
    • Pro Tip: Agar sets at room temp; gelatin needs chilling.

    11. Butterflying & Stuffing Proteins

    • What: Debone and flatten chicken, fish, or lamb for even cooking.
    • Use: Roulades, stuffed breasts.

    12. Consommé Clarification

    • What: Use egg whites to trap impurities, creating crystal-clear broth.
    • Key: Gentle simmering; avoid stirring.

    13. Lamination (Layered Doughs)

    • What: Fold butter into dough (croissants, puff pastry).
    • Trick: Chill between folds to prevent melting.

    14. Flash Pickling

    • What: Quick-pickle veggies in hot brine (30 mins to 2 hours).
    • Use: Topping for tacos, sandwiches.

    15. Infusions (Oil, Alcohol, Vinegar)

    • What: Steep herbs, spices, or fruit in liquids.
    • Example: Chili oil, vanilla bourbon.

    16. Pressure Cooking for Depth

    • What: Extract rich flavors in minutes (bone broth, stews).
    • Tool: Instant Pot or stovetop pressure cooker.

    17. Curing & Charcuterie

    • What: Preserve meats with salt, sugar, and spices (pancetta, gravlax).
    • Safety: Use curing salt (Prague Powder #1) for botulism prevention.

    18. Sugar Work (Caramel, Blown Sugar)

    • What: Cook sugar to precise temps for decorations.
    • Stages: Thread (230°F/110°C) → Hard crack (300°F/149°C).

    19. Sous Vide Egg Yolks (63°C/145°F)

    • What: Silky, custard-like yolks for ramen or salads.
    • Time: 45–60 minutes.

    20. Butchery & Fabrication

    • What: Break down whole animals (fish, poultry, lamb) to save costs.
    • Skill: Learn seam butchery to minimize waste.

    Pro Tips for Mastery

    • Practice one technique at a time—start with sous vide or confit.
    • Document results: Note temps, times, and ratios.
    • Invest in tools: Immersion circulator, smoking gun, precision scale.

    These techniques open doors to Michelin-star creativity or next-level home cooking. Which one will you try first? 🍳

Design a site like this with WordPress.com
Get started