Tag: cooksclub09

  • Home – Easy Recipes – Dishes – Cooking Guide

    Recipe by : chef ssentongo

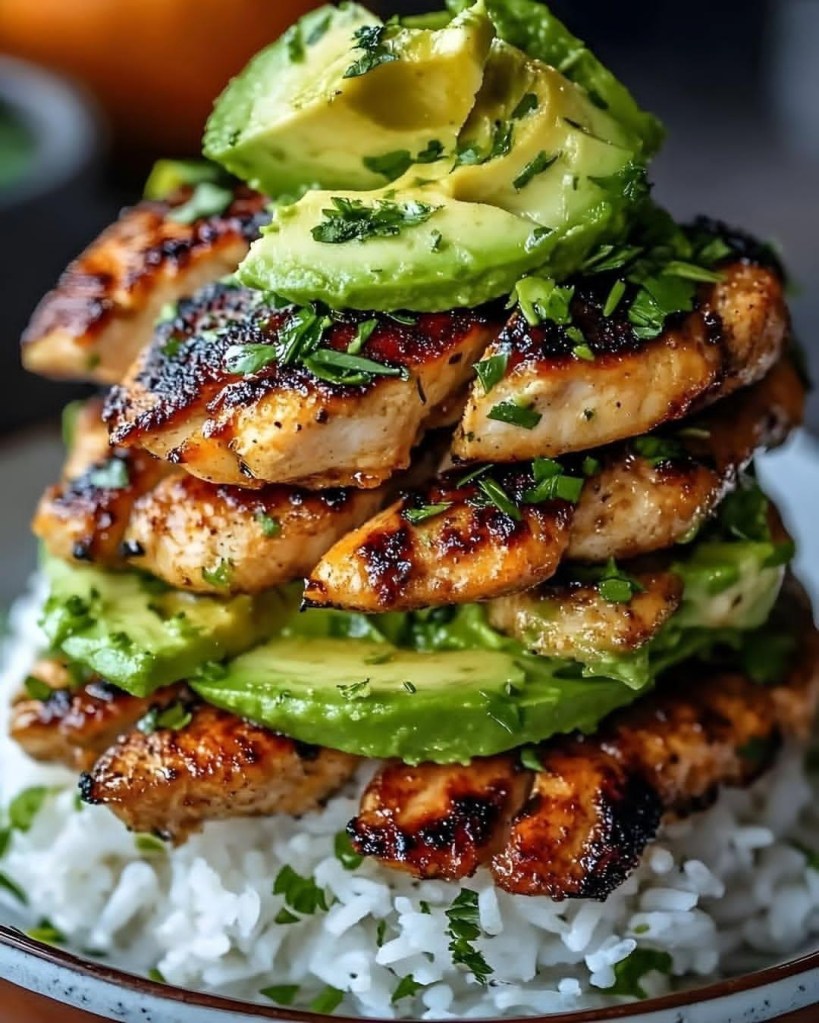
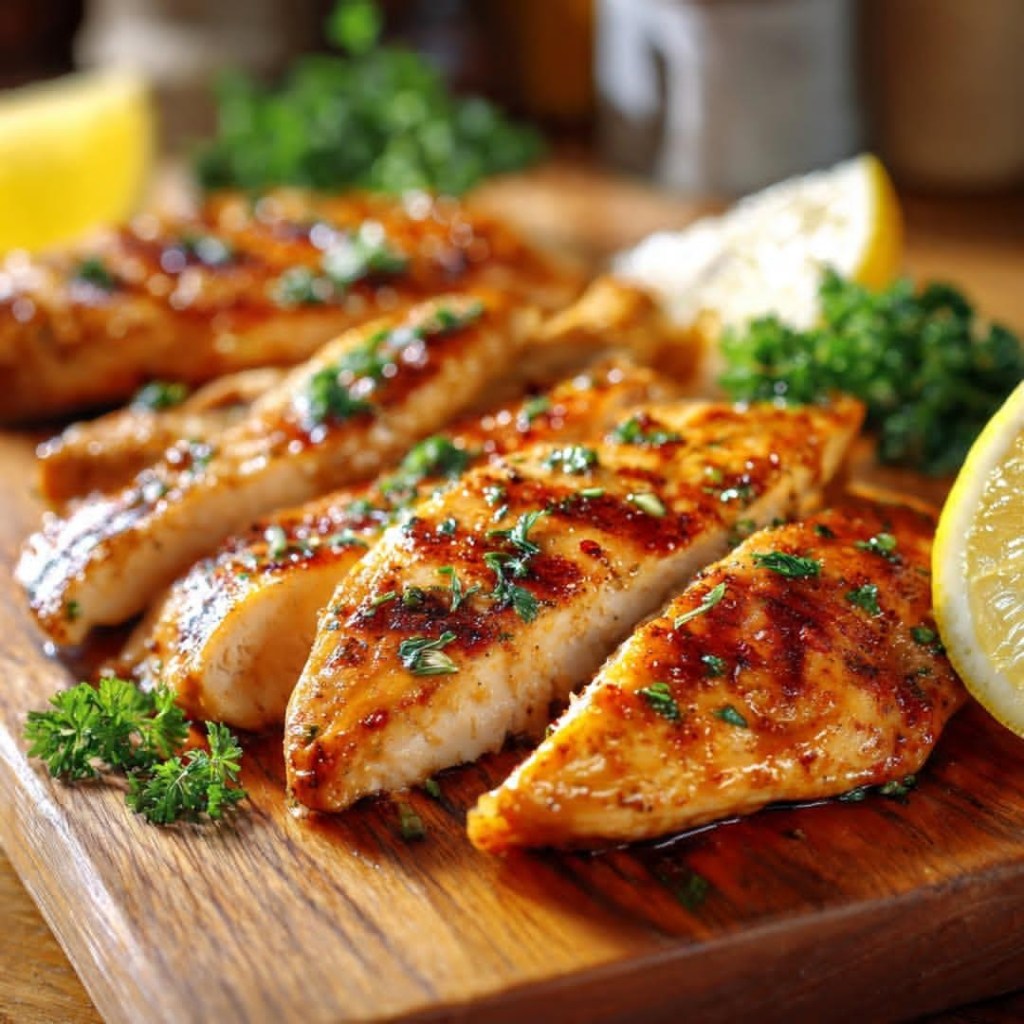
    GRILLED LEMON ‑HERB CHICKEN BREAST RECIPE

    Ingredients (serves 4)

    • 4 boneless, skinless chicken breasts (about 6‑8 oz each)
    • 2 tbsp olive oil
    • 2 tbsp lemon juice (freshly squeezed)
    • 2 tsp lemon zest
    • 2 cloves garlic, minced
    • 1 tsp paprika
    • 1 tsp dried thyme (or 1 tbsp fresh thyme leaves)
    • 2 tbsp fresh parsley, chopped (plus extra for garnish)
    • Salt & black pepper, to taste
    • Lemon wedges (for serving)
    • Fresh parsley sprigs (for garnish)

    Cooking Instructions

    1. Prep the marinade: In a bowl, whisk together olive oil, lemon juice, lemon zest, garlic, paprika, thyme, parsley, salt & pepper.
    2. Marinate the chicken: Place chicken breasts in a zip‑lock bag or shallow dish. Pour the marinade over them, coat evenly, and seal. Refrigerate ≥30 min (up to 2 h).
    3. Preheat grill: Heat a grill or grill pan to medium‑high heat (≈ 375‑400 °F / 190‑200 °C). Lightly oil the grates.
    4. Grill the chicken: Remove chicken from marinade (discard excess). Grill 6‑8 min per side, or until internal temperature reaches 165 °F (74 °C) and the surface has nice grill marks. Baste with leftover marinade during the first half of cooking for extra flavor.
    5. Rest: Transfer chicken to a cutting board, let rest 5 min. Slice thinly if desired.
    6. Serve: Arrange slices on a wooden board, drizzle any remaining pan juices, sprinkle extra chopped parsley, and add lemon wedges on the side for squeezing.

    Tips & Variations

    • For a smokier flavor, add a pinch of smoked paprika or grill over charcoal.
    • Swap parsley for cilantro or add a dash of chili flakes for heat.
    • Pair with rice, salad, or roasted veggies for a full meal.

    You want me to tweak any part of the recipe (e.g., spice level, cooking method) or need a side dish suggestion?

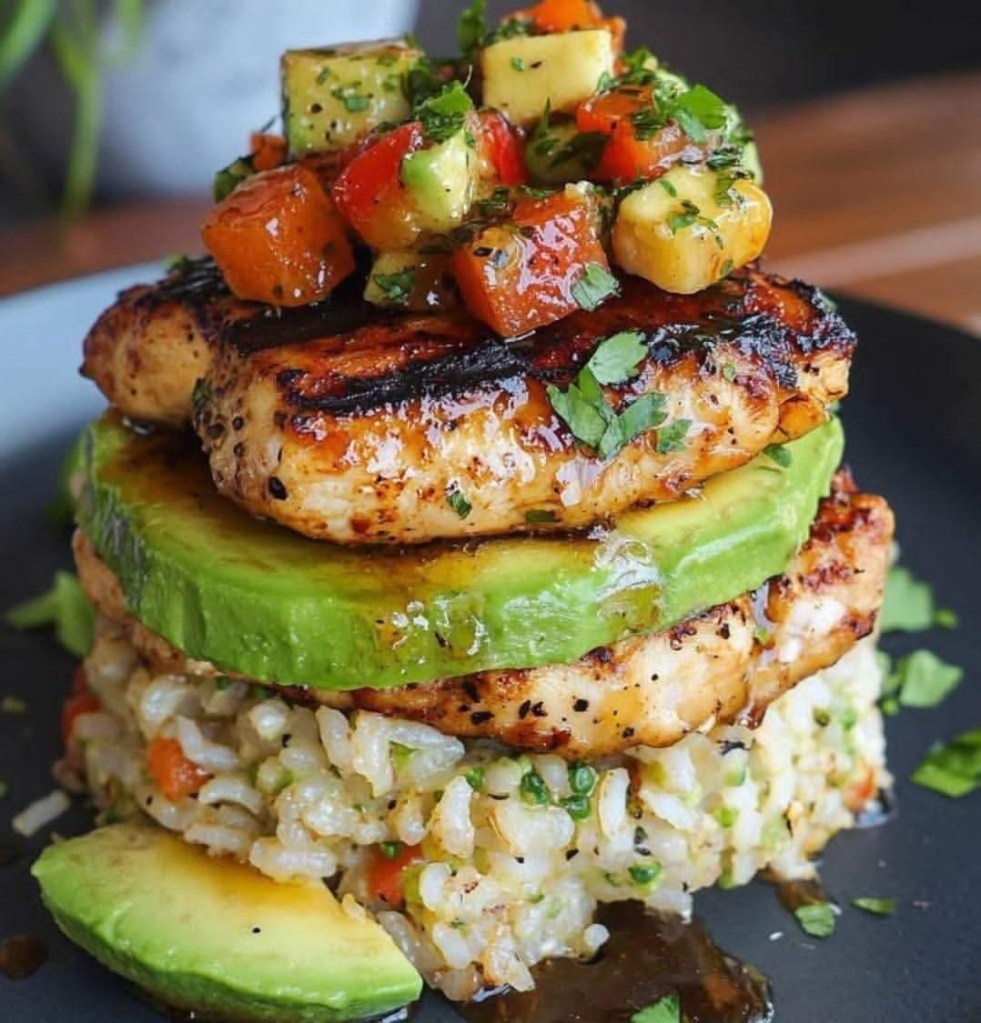
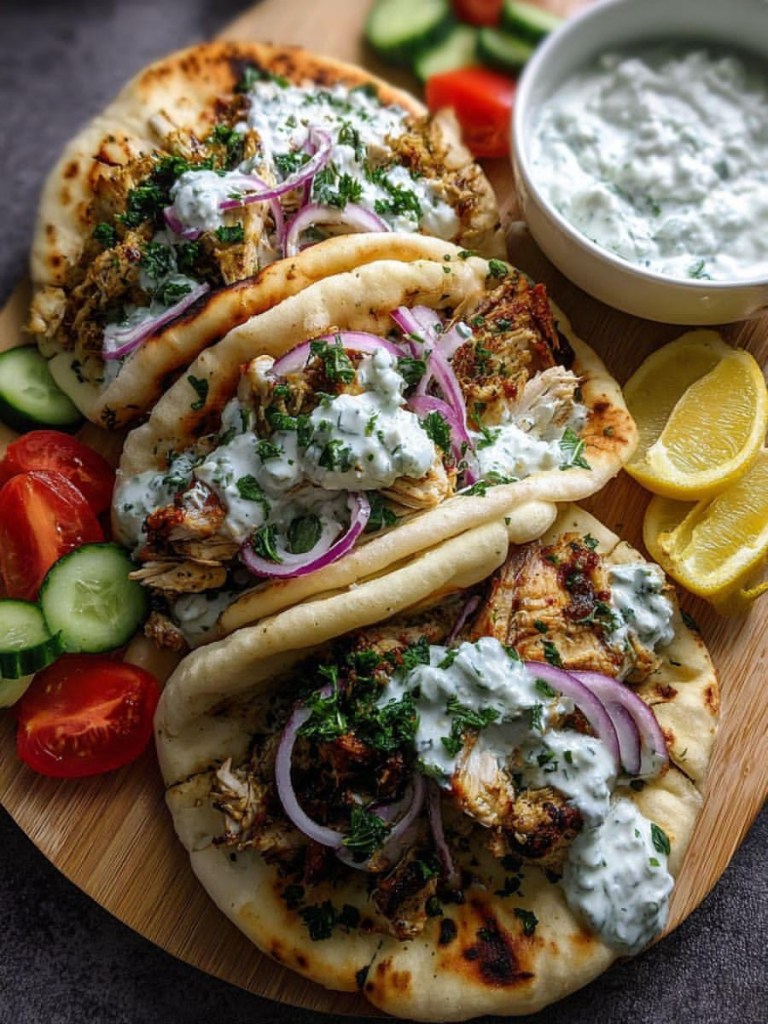
    CHICKEN GYRO RECIPE (SERVED IN PITA WITH TZATZIKI )

    Ingredients

    • 500 g chicken breast, thinly sliced or cubed
    • 2 tbsp olive oil
    • 1 tsp garlic powder
    • 1 tsp dried oregano
    • 1 tsp smoked paprika
    • ½ tsp ground cumin
    • Juice of 1 lemon
    • Salt & pepper to taste
    • 4 pita or flatbreads
    • 1 red onion, thinly sliced
    • Fresh parsley, chopped (for garnish)

    Tzatziki sauce:

    • 1 cup Greek yogurt
    • 1 cucumber, grated & squeezed dry
    • 1 tsp garlic, minced
    • 1 tbsp olive oil
    • 1 tbsp lemon juice
    • 1 tsp dill (fresh or dried)
    • Salt to taste

    Cooking Instructions

    1. Marinate chicken: Mix olive oil, garlic powder, oregano, paprika, cumin, lemon juice, salt & pepper. Add chicken, toss to coat, and let sit 30 min (or up to 2 h in fridge).
    2. Cook chicken: Heat a grill pan or skillet over medium‑high heat. Cook chicken 4‑5 min per side until charred & cooked through. Slice into strips.
    3. Make tzatziki: Combine yogurt, grated cucumber, garlic, olive oil, lemon juice, dill & salt. Mix well; refrigerate 15 min to let flavors meld.
    4. Warm pitas: Heat pitas on the grill or in a dry pan 1‑2 min per side, until soft & lightly toasted.
    5. Assemble gyros: Place chicken strips in each pita, top with red onion slices, drizzle generous tzatziki, sprinkle parsley. Serve with lemon wedges, cucumber & tomato on the side.

    Tips & Variations

    • Swap chicken for lamb or beef for a different flavor.
    • Add tomato slices or lettuce inside the pita for extra crunch.
    • Use store‑bought tzatziki if you’re short on time.

    You want the full step‑by‑step video guide or just the written recipe is enough for you? 🤔

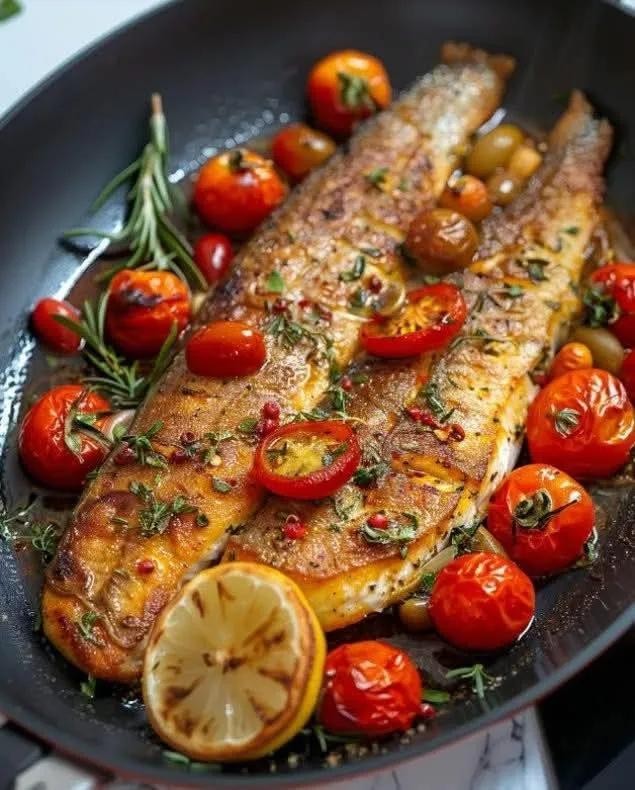
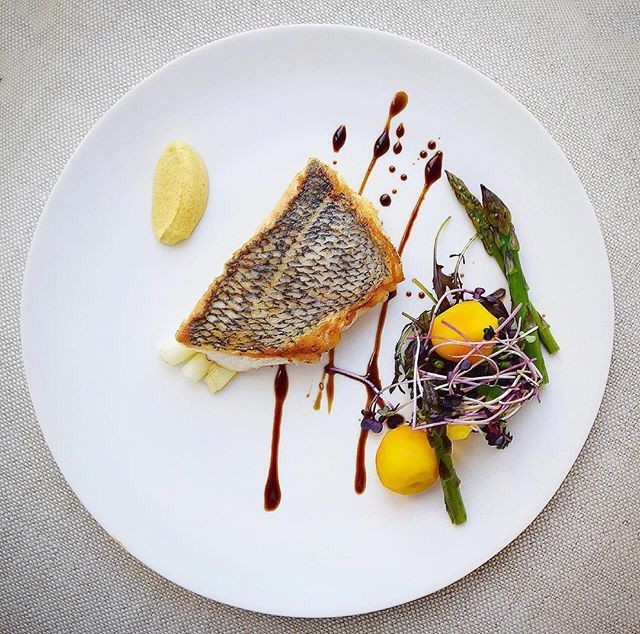
    * PAN ‑SEARED FISH WITH ASPARAGUS & BEET REDUCTION – RECIPE

    1. Ingredients (serves 1)
      • 1 fillet white fish (e.g., sea bass or snapper), skin on
      • 2–3 asparagus spears, trimmed
      • 2 yellow baby potatoes or small boiled potatoes, halved
      • Micro‑greens & purple sprouts (a handful)
      • 1 tsp mustard (yellow sauce on the side)
      • 2 tsp balsamic or beet reduction sauce
      • Salt & pepper, to taste
      • Olive oil or butter, for frying
      • Optional: lemon zest or juice for seasoning
    2. Method
      1. Prep the veggies: Blanch asparagus in salted water 2‑3 min, then shock in ice water. Toss potatoes with a little oil, salt & pepper, and roast or steam until tender.
      2. Season the fish: Pat fillet dry, season both sides with salt & pepper.
      3. Sear the fish: Heat a skillet with a splash of oil (or butter) over medium‑high heat. Place fish skin‑side down; press gently for 30 s. Cook 3‑4 min until skin is crisp, then flip & cook another 2 min for medium doneness.
      4. Plate: Arrange sliced potatoes at the base of the plate, lay the fish on top. Add asparagus and micro‑green mix with yellow potatoes on the side. Drizzle balsamic/beet reduction in artistic streaks. Place a quenelle of mustard on the upper left of the plate.
    3. Tips
      • For extra flavor, finish the fish with a squeeze of lemon juice or a dash of zest.
      • Adjust the reduction thickness by simmering it longer for a richer glaze.

    You want me to tweak any part of the recipe (e.g., swap ingredients, adjust seasoning, or give plating tips)? 🚀

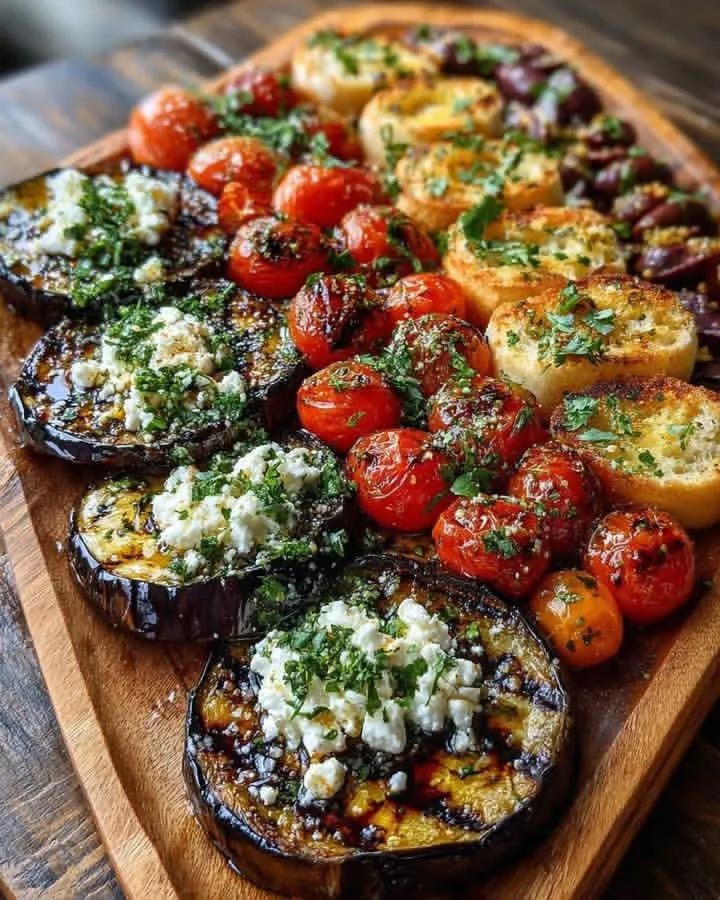
    * GRILLED MEDITERRANEAN VEGGIE PLATTER RECIPE

    Servings: 4–6 people
    Prep time: 15 min | Cook time: 20 min

    Ingredients

    • 2 large eggplants, sliced into 1/2‑inch rounds
    • 2 cups cherry tomatoes (mixed colors)
    • 2 medium zucchini, sliced into 1/2‑inch rounds
    • 1 cup Kalamata olives (optional)
    • 4 tbsp olive oil (divided)
    • 1 tsp salt
    • ½ tsp black pepper
    • 2 garlic cloves, minced
    • 100 g feta cheese, crumbled
    • 2 tbsp fresh parsley, chopped
    • 1 tsp dried oregano
    • Juice of ½ lemon

    Method

    1. Preheat grill or oven to 200 °C (400 °F).
    2. Season eggplant and zucchini slices with 2 tbsp olive oil, salt, pepper, and half the garlic. Toss cherry tomatoes with 1 tbsp olive oil, remaining garlic, salt & pepper.
    3. Grill the veggies:
      • Eggplant & zucchini 4–5 min per side, until charred and tender.
      • Tomatoes 3–4 min, just until blistered.
    4. Arrange grilled veggies on a serving board with olives at the side.
    5. Dressing: mix remaining olive oil, lemon juice, oregano, and parsley. Drizzle over the vegetables.
    6. Finish by sprinkling crumbled feta and extra parsley on the eggplant slices.

    Tips & Variations

    • Swap feta for goat cheese if you prefer a creamier taste.
    • Add grilled halloumi or bread slices for extra texture.
    • Serve with a side of quinoa or flatbread for a full meal.

    You want the exact measurements for a specific serving size or any tweaks to the recipe?

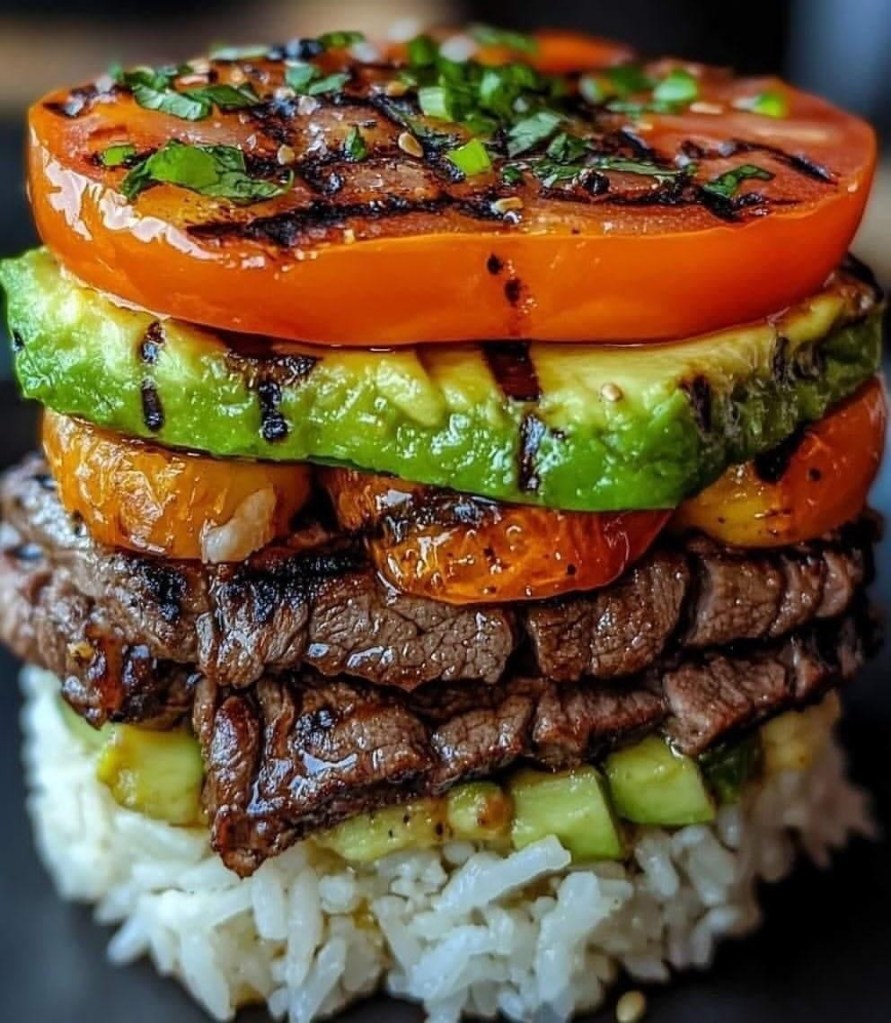
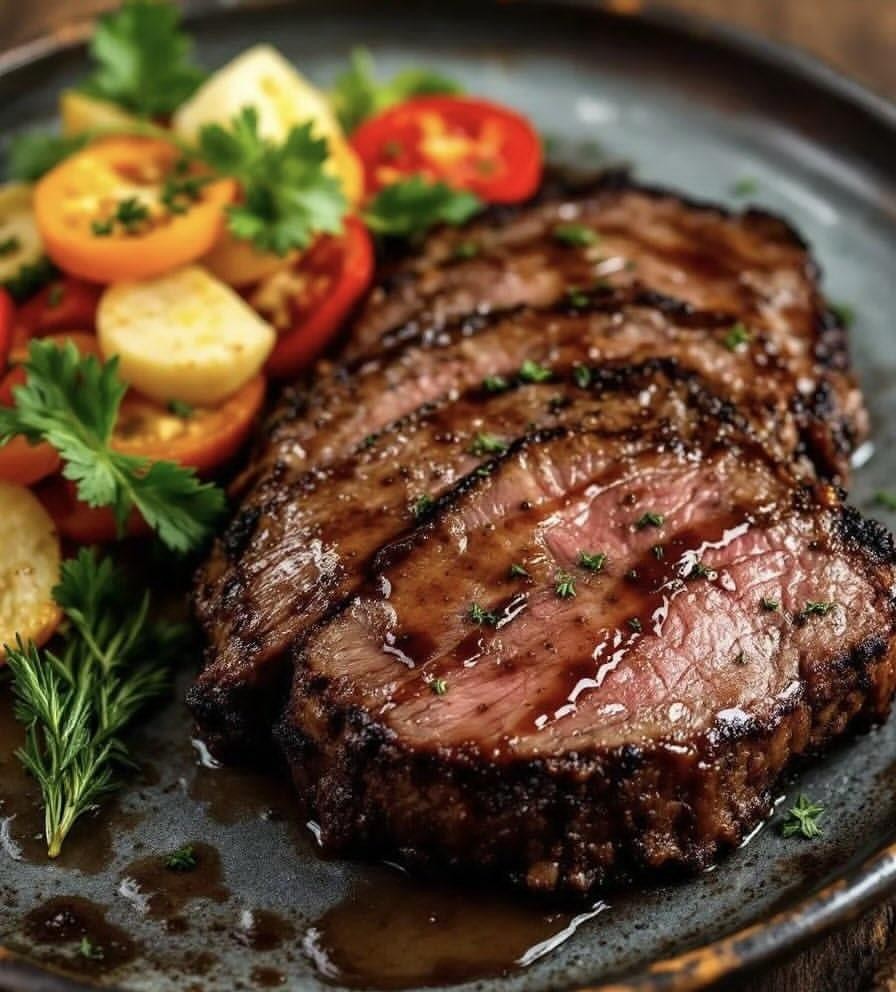
    * GRILLED STEAK WITH ROASTED VEGGIES RECIPE

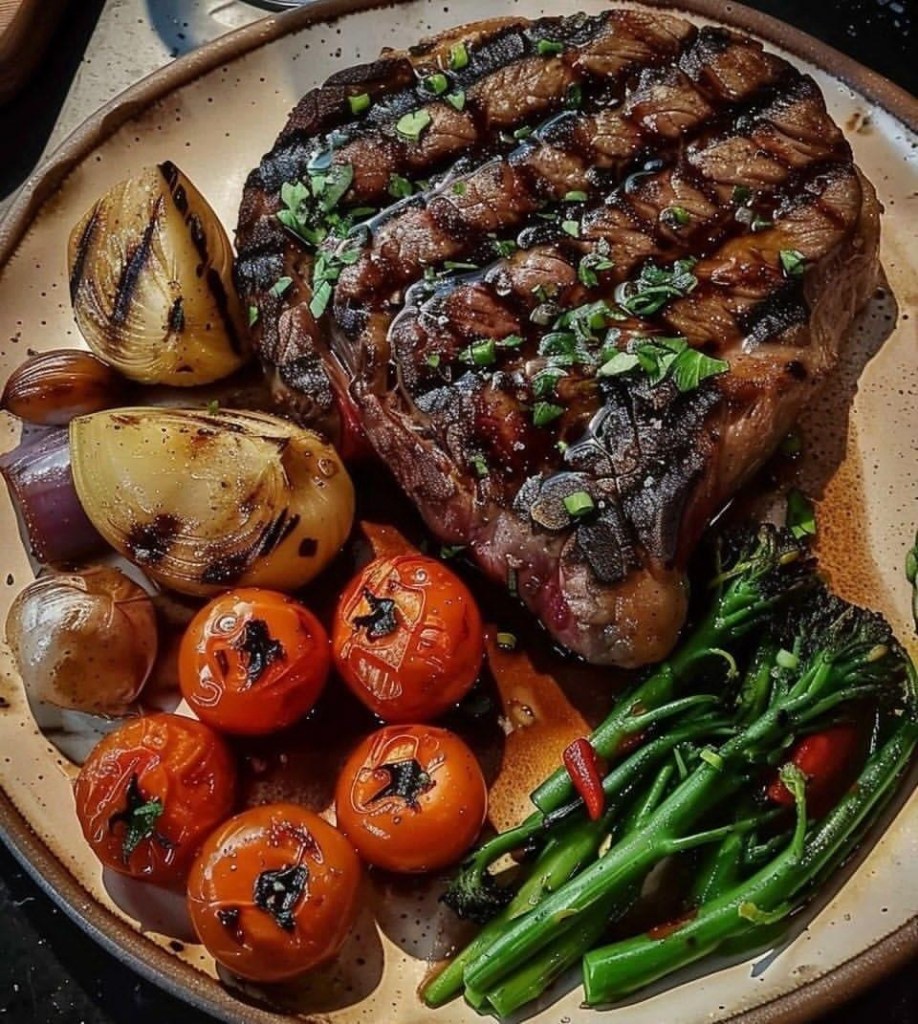
    Servings: 2–3 people
    Prep time: 15 min | Cook time: 25 min

    Ingredients

    • 1 large steak (ribeye or sirloin), about 1–1.5 kg
    • 2 whole onions, halved
    • 6–8 cherry tomatoes
    • A bunch of broccolini (or broccoli)
    • 1 red chili, sliced (optional)
    • Fresh herbs (parsley or basil), chopped
    • 2 tbsp olive oil
    • Salt & black pepper, to taste
    • Optional: garlic cloves, balsamic glaze or soy sauce for marinade

    Cooking Instructions

    1. Prep the steak: Pat the meat dry. Rub both sides with olive oil, salt, pepper, and any desired seasoning (garlic, herbs). Let it sit 10 min at room temp.
    2. Grill the steak: Preheat grill or pan to high heat. Sear steak 4–5 min per side for medium‑rare (or to your liking). After flipping, add a drizzle of oil and sprinkle chopped herbs on top. Rest 5 min, then slice thinly against the grain.
    3. Roast the veggies: Toss onion halves, cherry tomatoes, and broccolini with olive oil, salt, and pepper. Place them on the grill or in a hot oven (200 °C) for 10–12 min, turning once, until charred and tender. Add chili slices in the last 2 min.
    4. Finish: Arrange steak and veggies on a serving plate. Drizzle any pan juices or a bit of balsamic glaze over the meat. Sprinkle extra fresh herbs on top.

    Tips & Variations

    • Marinate the steak in soy sauce + garlic for 30 min for extra flavor.
    • Swap broccolini with regular broccoli or asparagus.
    • Serve with mashed potatoes or a simple salad for a full meal.

    You want the full step‑by‑step cooking video guide or just the written recipe like this? 🍽️👨‍🍳

    You Can also find us on Facebook #easyrecipe06 #easyrecipe006 #easyrecipe09 #cooksclub09

  • Home – Easy Recipes – Dishes – Cooking Guide

    GRILLED STEAK & VEGGIE STACK WITH RICE

    Ingredients (serves 2)

    • 300 g beef steak (thinly sliced)
    • 1 cup cooked white rice
    • 1 large tomato, sliced into thick rounds
    • 1 avocado, sliced
    • 1 tbsp olive oil (for brushing)
    • 1 tsp soy sauce or your favorite marinade
    • Salt & pepper, to taste
    • Fresh basil or cilantro, chopped (for garnish)
    • Optional: pinch of sesame seeds or chili flakes

    Cooking Instructions

    1. Prep the steak: Season the beef slices with salt, pepper, and soy sauce. Let it marinate 10 min.
    2. Cook the rice: Cook rice according to package (steam or boil). Keep warm.
    3. Grill the veggies: Brush tomato and avocado slices with olive oil. Grill on medium heat 2–3 min per side, until char marks appear.
    4. Grill the steak: On the same grill, cook the marinated beef 2–3 min per side for medium‑rare, or to your liking. Slice into strips if needed.
    5. Assemble the stack: On a plate, layer rice at the base, add avocado, then steak, another avocado slice, grilled tomato, and finish with the top tomato slice.
    6. Finish: Drizzle a little oil or extra sauce over the top, sprinkle chopped basil (or cilantro) and optional sesame seeds.

    Tips & Variations

    • Swap beef for chicken or tofu for a different protein.
    • Add a squeeze of lime juice on the veggies for extra zing.
    • Serve with a side salsa or yogurt dip if you like.

    You want the full step‑by‑step cooking video guide or just the written recipe like this? 🍽️👨‍🍳

    * GRILLED CHICKEN & AVOCADO RICE STACK RECIPE

    1. Ingredients (serves 2)
      • 2 chicken breasts (about 6 oz each)
      • 1 ½ cups cooked rice (white or brown)
      • 1 small carrot, diced
      • ½ cup peas or green onions, chopped
      • 1 ripe avocado, sliced thick
      • 1 tomato, diced
      • ½ pineapple, diced
      • Fresh cilantro, chopped
      • 2 tbsp olive oil
      • 1 tbsp soy sauce or teriyaki glaze
      • Salt, black pepper, garlic powder (to taste)
    2. Season & grill the chicken
      • Rub chicken with olive oil, salt, pepper, garlic powder.
      • Grill on medium‑high heat 5‑6 min per side, or until internal temp reaches 165°F (74°C).
      • Brush with soy/teriyaki sauce in the last minute for glaze.
    3. Prepare the rice mix
      • Sauté carrot & peas in 1 tbsp oil for 2 min.
      • Mix in cooked rice, season with salt & pepper.
      • Add a pinch of sesame seeds or herbs if you like.
    4. Make the fruit salsa
      • Combine tomato, pineapple, avocado cubes, cilantro, a drizzle of olive oil, pinch of salt & pepper.
      • Toss gently.
    5. Assemble the stack (on a plate or ring mold)
      • Layer 1: rice mixture at the base.
      • Layer 2: slice of avocado.
      • Layer 3: grilled chicken breast.
      • Layer 4: second avocado slice (optional).
      • Layer 5: second chicken breast.
      • Top with fruit salsa and extra cilantro.
    6. Serve
      • Drizzle remaining glaze or a little olive oil around the stack.
      • Serve with extra avocado slice on the side for garnish.

    Tip: Want the dish spicier? Add chopped chili to the salsa or the chicken seasoning. Need a shortcut? Use pre‑marinated chicken or pre‑cooked rice.

    * GRILLED STEAK WITH HERB BUTTER & VEGGIE MEDLEY

    Ingredients

    • 2 ribeye or strip loin steaks (about 1–1½ inch thick)
    • 2 tbsp olive oil
    • Salt & freshly cracked black pepper
    • 2 garlic cloves, minced
    • 1 tbsp fresh rosemary, chopped (or 1 tsp dried)
    • 1 tbsp fresh thyme leaves (or 1 tsp dried)
    • 2 tbsp butter, softened
    • 1 parsley sprig (for garnish)
    • 2 tomatoes, sliced
    • 2 potatoes, boiled & sliced
    • Fresh parsley & rosemary for veggie garnish

    Method

    1. Season the steaks with olive oil, salt, pepper, garlic, rosemary & thyme. Rub well. Let sit 30 min at room temp.
    2. Heat a grill or heavy skillet to high. Sear steaks 4–5 min per side for medium‑rare (adjust time for thickness).
    3. Rest steaks 5 min, then slice thinly across the grain.
    4. Herb butter: mix softened butter with a pinch of salt, minced garlic & chopped thyme. Drizzle over hot steak slices.
    5. Veggies: arrange tomato & potato slices on a plate, sprinkle with salt, pepper & fresh herbs.
    6. Plate: lay sliced steak beside the veggie medley, garnish with parsley & rosemary sprigs.

    Tips

    • Use a meat thermometer: 130°F for medium‑rare, 140°F for medium.
    • For extra flavor, baste the steak with butter during grilling.

    You want the exact cooking times for a thicker cut or a different doneness level?

    * GRILLED CHICKEN & AVOCADO STACK WITH RICE RECIPE

    1. Ingredients (serves 2):
      • 2 chicken breasts, sliced into thin fillets
      • 2 ripe avocados, sliced
      • 1 cup white rice
      • 2 tbsp olive oil
      • 2 tbsp soy sauce
      • 1 tbsp honey
      • 1 tsp garlic powder
      • 1 tsp smoked paprika
      • Fresh cilantro or parsley, chopped (for garnish)
      • Salt & pepper to taste
    2. Marinate the chicken:
      Mix olive oil, soy sauce, honey, garlic powder, paprika, salt & pepper. Toss chicken fillets in the mix, let sit 20 min.
    3. Cook the rice:
      Rinse rice, cook in 2 cups water (1:2 ratio) until fluffy. Sprinkle with chopped cilantro.
    4. Grill the chicken:
      Heat a grill pan or skillet over medium‑high heat. Cook marinated chicken 3–4 min per side until charred and cooked through.
    5. Assemble the stack:
      On a plate, layer rice, a chicken fillet, avocado slices, another chicken fillet, and repeat, finishing with avocado on top. Sprinkle cilantro over the stack.
    6. Serve:
      Slice through the stack to reveal the layers or serve as a deconstructed bowl.

    * FRESH AVOCADO & GREENS SALAD

    Ingredients (serves 1)

    • Mixed greens (arugula, spinach) – 2 cups
    • Avocado, thinly sliced – 1 medium
    • Cherry tomatoes, halved – 8–10 pieces
    • Yellow bell pepper, diced – 2 tbsp
    • Feta cheese, cubed – 30 g
    • Microgreens or sprouts for garnish – a handful
    • Balsamic glaze – 2 tbsp (for drizzling & plate decoration)
    • Olive oil with herbs (in the bottle) – 1 tbsp
    • Black peppercorns, crushed – ¼ tsp
    • Salt – to taste

    Method

    1. Prep the base: Wash and dry the mixed greens. Place them in the center of a white plate, forming a mound.
    2. Layer the veggies: Arrange avocado slices in an overlapping line on the greens. Scatter cherry tomato halves and yellow bell pepper pieces around and on top. Add feta cubes among the vegetables.
    3. Garnish: Top with microgreens or sprouts for freshness and visual pop. Sprinkle crushed black peppercorns over the avocado.
    4. Dressing: Drizzle olive oil over the salad, then swirl balsamic glaze around the plate edge and in a thin line over the salad to create the orange‑brown decorative streaks.
    5. Finish: Add a pinch of salt to taste and serve immediately.

    Tip: If you want the exact glossy plate design, use a squeeze bottle to draw the balsamic glaze in concentric circles before adding the salad.

    You want me to tweak any part of the recipe or give serving suggestions? 🍽️✨

    Get Easy Recipes also in Facebook page #easyrecipe06 #easyrecipe006 #easyrecipe09 #cooksclub09

  • Home – Easy Recipes – Dishes – Cooking Guide

    CARROT CAKE DESSERT CUPS RECIPE

    Recipe by : chef ssentongo

    Ingredients:

    • 1 cup grated carrots
    • 1 cup crushed walnuts (or pecans)
    • 1/2 cup brown sugar
    • 1/4 cup all-purpose flour
    • 1/4 cup melted butter
    • 1 tsp cinnamon
    • 1/2 tsp nutmeg
    • 4 oz cream cheese, softened
    • 1/4 cup powdered sugar
    • 1/2 cup heavy cream
    • Carrot ribbons (for decoration)
    • Fresh microgreens & edible flowers (optional garnish)

    Prep Instructions:

    1. Crumb base: Mix grated carrots, crushed walnuts, brown sugar, flour, melted butter, cinnamon, and nutmeg. Press the mixture into the bottom of small cylindrical molds to form the base layer. Chill for 10 min.
    2. Cream filling: Beat cream cheese with powdered sugar until smooth. Whip heavy cream to soft peaks and fold into the cream cheese mix. Spoon the cream mixture over the chilled base, smoothing the top. Refrigerate for 30 min.
    3. Assembly: Unmold the cups onto a serving plate. Press crushed walnut mixture around the lower edge of each cup for a textured finish (like in the photo).
    4. Decoration: Top each cup with a carrot ribbon rose, a small dollop of whipped cream, a walnut piece, and microgreens or edible flowers for garnish.

    Serving tip:
    Keep the dessert cups chilled until ready to serve. Remove molds gently to preserve the layered look.

    Do you need measurements for a specific number of servings or any variations (e.g., vegan or gluten‑free)?

    * SHRIMP & VEGGIE SALAD WITH FRESH FRUIT GARNISH

    Ingredients (serves 2)

    • 200 g cooked shrimp, peeled & deveined
    • 100 g crab meat (or imitation crab sticks), shredded
    • 1 medium carrot, julienned
    • 1 zucchini, julienned
    • ½ red bell pepper, thinly sliced
    • 1 small onion, sliced into thin strips
    • 2 tbsp corn kernels (canned or fresh)
    • Fresh cilantro & mint leaves, chopped (for garnish)
    • 1 avocado, sliced (for serving)
    • Mixed fruit garnish: mango cubes, strawberry, blueberries
    • Dressing: 2 tbsp lime juice, 1 tbsp olive oil, 1 tsp honey, pinch of salt & pepper (mix & adjust to taste)

    Instructions

    1. Prep the veggies & seafood – julienne carrot & zucchini, slice bell pepper & onion. Toss shrimp and crab meat with a little lime juice.
    2. Mix the salad – in a large bowl combine carrot, zucchini, bell pepper, onion, corn, shrimp & crab. Add the dressing, toss gently to coat everything evenly.
    3. Plate the dish – arrange the mixed salad in a long strip down the center of a slate serving board, shaping it into an “S” or two parallel lines as in the photo.
    4. Garnish – sprinkle chopped cilantro & mint over the salad. Place avocado slices at one end of the board and a fruit medley (mango, strawberry, blueberry) at the other end, adding a mint leaf on each fruit group for decoration.
    5. Finish – drizzle a little extra dressing on the salad if desired and serve immediately.

    You want the exact measurements for the dressing or tips for making the veggies extra crisp?

    * PAN ‑SEARED FISH WITH RISOTTO, CHICKEN , VEGGIES & PESTO

    Ingredients (serves 2)

    • 2 white fish fillets (e.g., cod or halibut), about 150 g each
    • 200 g risotto rice (Arborio)
    • 250 ml chicken or vegetable broth (keep warm)
    • 100 ml white wine (optional)
    • 1 small onion, finely chopped
    • 2 tbsp butter
    • 2 tbsp olive oil (divided)
    • 100 g chicken breast, diced
    • 50 g edamame or green peas
    • 4 cherry tomatoes, halved
    • 2 tbsp pesto (basil or green herb)
    • Salt, pepper, and garlic powder to taste
    • Fresh herbs (optional, for garnish)

    Instructions

    1. Prep the base
      • Heat 1 tbsp olive oil in a pan, sauté onion till translucent. Add rice, toast 2 min.
      • Add white wine, stir till absorbed. Gradually add warm broth, ½ ladle at a time, stirring constantly until rice is creamy (≈18 min).
    2. Add veggies to risotto
      • When risotto is nearly done, stir in edamame (or peas) and season with salt & pepper. Keep warm.
    3. Cook the chicken
      • In another pan, heat 1 tbsp butter + ½ tbsp olive oil. Season chicken cubes with salt & pepper, sear 4‑5 min until golden. Set aside.
    4. Cook the fish
      • Pat fish dry, season with salt, pepper & garlic powder.
      • In the same pan, add remaining ½ tbsp olive oil + 1 tbsp butter. Sear fish 3‑4 min per side until golden and flaky. Top each fillet with a spoonful of pesto.
    5. Assemble the plate
      • Spoon risotto onto the plate, scatter chicken cubes & cherry tomato halves around.
      • Place the pesto‑topped fish fillet in the center. Garnish with extra herbs if you like.
    6. Serve
      • Serve hot, optionally with a glass of white wine.

    Tips & Variations

    • Swap chicken for tofu for a veggie version.
    • Use homemade pesto or add lemon zest to the fish for extra zing.
    • Adjust broth amount if you prefer thicker risotto.

    You want me to tweak any part of the recipe or give plating tips? 🍽️✨

    * CHICKEN CORDON BLEU ROLL RECIPE (Stuffed & Breaded Chicken Breast)

    Ingredients (serves 4)

    • 4 large chicken breasts (boneless, skinless)
    • 4 slices ham (thinly cut)
    • 4 slices cheese (Swiss or mozzarella work well)
    • 1/2 cup cream cheese, softened
    • 1 tbsp fresh parsley, chopped (plus extra for garnish)
    • 1 tsp garlic powder
    • Salt & pepper, to taste
    • 1/2 cup all‑purpose flour
    • 2 eggs, beaten
    • 1 cup breadcrumbs (panko for extra crunch)
    • 2 tbsp butter, melted (for brushing)
    • Cooking oil (for frying or baking)

    Filling mix

    1. In a bowl combine cream cheese, chopped parsley, garlic powder, a pinch of salt & pepper.
    2. Spread the mix on the ham slice, add a slice of cheese, then roll the ham‑cheese together.

    Instructions

    1. Prepare chicken: Butterfly each breast to open it like a book. Pound to an even 1/4‑inch thickness. Season both sides with salt & pepper.
    2. Stuff: Place a ham‑cheese roll in the center of each breast. Fold the chicken over the filling and secure with toothpicks or tie with kitchen string.
    3. Bread: Set up a breading station – flour in one bowl, beaten egg in another, breadcrumbs in the third. Dredge each chicken roll in flour, dip in egg, then coat with breadcrumbs, pressing gently to stick.
    4. Cook:
      • Oven: Preheat to 190 °C (375 °F). Place rolls on a baking sheet, brush with melted butter, and bake 25‑30 min until golden and internal temp reaches 75 °C (165 °F).
      • Pan‑fry: Heat oil in a skillet over medium‑high heat. Fry rolls 3‑4 min per side until crisp, then finish in a 180 °C (350 °F) oven for 10‑12 min.
    5. Serve: Remove toothpicks, slice each roll into thick medallions (as shown in the image). Drizzle any remaining creamy filling or a light sauce if desired, and sprinkle fresh parsley on top for garnish.

    You want the exact cooking method (oven or pan‑fry) you prefer, or do you need tips for making the crust extra crunchy?

    * PAN ‑SEARED HERB ‑INFUSED FISH WITH CHERRY TOMATOES & LEMON

    Ingredients (serves 2)

    • 2 whole fish fillets (about 200 g each), skin on or off (looks like trout or sea bass in the pic)
    • 1 tsp salt + ½ tsp black pepper
    • 1 tsp dried thyme (or fresh thyme leaves)
    • 1 tsp dried rosemary (or a sprig fresh rosemary)
    • 2 tbsp olive oil
    • 2 cloves garlic, thinly sliced
    • 1 cup cherry tomatoes, halved
    • 1 red chili, thinly sliced (optional for heat)
    • 1 lemon, sliced in half (one half for juice, one half for charring)
    • Fresh parsley or mixed herbs, chopped (for garnish)
    • Pinch of red pepper flakes (optional)

    Instructions

    1. Season the fish fillets with salt, pepper, thyme, and rosemary on both sides.
    2. Heat olive oil in a large skillet over medium‑high heat.
    3. Sear the fish, skin‑side down first, for 3–4 min until golden and crisp. Flip and cook the other side 2–3 min. Remove fish to a plate and set aside.
    4. Add sliced garlic to the same pan; sauté 30 s until fragrant.
    5. Toss in cherry tomatoes, chili slices, and rosemary sprig. Cook 3–4 min, stirring gently, until tomatoes soften and release juice.
    6. Deglaze with a splash of lemon juice (squeeze half the lemon). Let the liquid reduce slightly.
    7. Return the fish to the pan, nestling it among the tomatoes. Add a charred lemon half in the pan for flavor. Sprinkle red pepper flakes if you like heat.
    8. Simmer for 2 min so the fish soaks up the sauce.
    9. Finish with chopped fresh herbs over the top.

    Serving tip
    Plate the fish with the tomato‑lemon sauce spooned over it. Serve hot with rice, mashed potatoes, or crusty bread to soak up the juices.

    You want me to tweak any part of the recipe (e.g., swap herbs, use a different fish, or make it spicier), or do you need the step‑by‑step in a different format (like bullet points or a cooking timeline)?

    * BRAISED BEEF SHORT RIBS WITH CRANBERRY ‑APPLE GLAZE

    Ingredients

    • 2 lb beef short ribs, cut into 2‑inch pieces
    • 2 tbsp olive oil
    • 1 large onion, quartered
    • 4 garlic cloves, smashed
    • 2 cups beef broth
    • 1/2 cup red wine (optional, can replace with more broth)
    • 1/4 cup soy sauce
    • 2 tbsp brown sugar
    • 1 tbsp tomato paste
    • 1 tsp fresh rosemary, chopped (plus a sprig for garnish)
    • 1 tsp fresh thyme leaves
    • 2 apples, peeled & cubed (shown as yellow fruit)
    • 1 small onion or shallot, whole (the small yellow bulb in the sauce)
    • 1/2 cup fresh or frozen cranberries (the red berries in the dish)
    • Salt & black pepper, to taste
    • Fresh chives, finely chopped (for garnish)

    Method

    1. Season the short ribs with salt & pepper.
    2. Sear the ribs in olive oil over medium‑high heat, 3‑4 min per side, until browned. Remove and set aside.
    3. In the same pot, sauté the quartered onion and garlic 2‑3 min until softened.
    4. Deglaze with red wine (or broth), scraping up brown bits.
    5. Add beef broth, soy sauce, brown sugar, tomato paste, rosemary, and thyme. Stir.
    6. Return ribs to the pot. Add whole shallot & apple cubes.
    7. Braise in a preheated oven at 325 °F (160 °C) for 2½–3 hours, until meat is fork‑tender.
    8. In the last 15 min, stir in cranberries and let them soften into the sauce.
    9. Finish by sprinkling chopped chives and placing a rosemary sprig on top for garnish, as shown in the image.

    Serving tip
    Plate the ribs with the apple‑cranberry sauce spooned over them, highlighting the glossy glaze and decorative berries & rosemary.

    Want me to tweak any part of the recipe (e.g., spice level, cooking method, or ingredient swap)?

    #easyrecipe09 #easyrecipe06 #cooksclub09# #recipe #food #homemade #homecooking #flavors #homecook #foodie

    http://www.chefsideacafe.food.blog

  • Home – Easy Recipes – Dishes – Cooking Guide

    GET EASY RECIPES AND COOK SMART

    9 BASIC FRENCH SAUCES

    Recipe by : chef ssentongo

    Chackout  the recipes and basic instructions for each of the 10 Essential French sauces shown in the image. Since the ingredients are already listed, I’ll add simple instructions for making each sauce.

    1. Béchamel Sauce
    • Ingredients: 2 tbsp butter, 2 tbsp flour, ¼ tsp nutmeg
    • Instructions: Melt butter, add flour to make a roux. Gradually whisk in milk (not listed but typically used). Season with nutmeg.
    1. Velouté Sauce
    • Ingredients: 2 tbsp butter, 2 tbsp flour, 1 cup veal stock, ¼ tsp parsley
    • Instructions: Make a roux with butter and flour. Gradually add veal stock, whisking until smooth. Season with parsley.
    1. Espagnole Sauce
    • Ingredients: 2 tbsp beef stock reduction, 1 cup beef stock, 1 tbsp salt, ¼ tsp phymer, 1 tsp cayenne pepper
    • Instructions: Reduce beef stock with seasonings to thicken. Strain and serve.
    1. Hollandaise Sauce
    • Ingredients: 3 tbsp butter, 1 tbsp flour, 1 cup veal stock, 1 tbsp mustard, ¼ tsp salt
    • Instructions: Make a roux with butter and flour. Whisk in veal stock and mustard. Simmer until thickened.
    1. Sauce Robert
    • Ingredients: ¼ cup prepared hollandaise sauce, 2 tbsp tomato paste, ¼ tsp cayenne pepper
    • Instructions: Mix prepared hollandaise with tomato paste and cayenne pepper.
    1. Sauce Choron
    • Ingredients: 2 tbsp butter, 1 cup choron, 1 tsp shallots, ¼ tsp lemon juice
    • Instructions: Mix choron base with butter, shallots, and lemon juice.
    1. Sauce Bordelaise
    • Ingredients: 2 tbsp butter, 1 tbsp flour, 1 cup red wine, 1 cup beef stock
    • Instructions: Make a roux with butter and flour. Add red wine and beef stock, simmer until thickened.
    1. Sauce Lyonnaise
    • Ingredients: 2 tbsp butter, 1 cup chicken stock, 2 tbsp white wine
    • Instructions: Reduce chicken stock with butter and white wine.
    1. Sauce Chasseur
    • Ingredients: 2 tbsp butter, 1 cup chicken stock, ¼ cup white wine, 1 tsp shallots
    • Instructions: Reduce chicken stock with butter, white wine, and shallots.

    Let me know if you’d like me to expand on any of these recipes or if you have other questions!

    6 PORK CHOPS MARINADES AND GRILLED INSTRUCTIONS BEST ON THE INFORGRAPHIC

    Yo, you want the full marathon recipe for cookin’ and instructions for all them 6 pork chop marinades, right?

    Here’s the whole shebang, straight‑up recipes with step‑by‑step instructions for each of the six marinades shown in the image 🔥🍖.


    🍽️ 6 Pork Chop Marinades (full recipes & instructions)

    1. Sweet & Spicy Pork Chops
      Marinade ingredients
    • ¼ cup soy sauce
    • 2 tbsp lemon juice
    • 2 tbsp olive oil
    • 3 tbsp honey
    • 1–2 tbsp hot sauce (adjust to heat)
    • 1 tsp salt
    • ½ tsp black pepper

    Instructions

    1. Whisk all ingredients together in a bowl.
    2. Place 4 pork chops in a zip‑lock bag or shallow dish.
    3. Pour marinade over chops, coat ‘em good.
    4. Marinate 2–4 hrs in the fridge (longer for more kick).
    5. Grill or pan‑sear chops 4–5 min per side until internal temp hits 145 °F.
    6. Rest 3 min, then serve with a drizzle of leftover sauce.
    7. Lemon Garlic Pork Chops
      Marinade ingredients
    • 3 tbsp lemon juice
    • 2 tbsp olive oil
    • 4 minced garlic cloves
    • 1 tbsp Italian seasoning
    • 1 tsp salt
    • ½ tsp black pepper

    Instructions

    1. Mix all ingredients in a bowl.
    2. Add pork chops to a dish and pour marinade over ‘em.
    3. Marinate 1–3 hrs in the fridge.
    4. Cook chops on grill or skillet 4 min each side until juicy.
    5. Let rest 3 min before eating.
    6. Balsamic Pork Chops
      Marinade ingredients
    • ¼ cup balsamic vinegar
    • 2 tbsp olive oil
    • 1 tsp dried basil
    • 1 tsp garlic powder
    • 1 tsp salt
    • ½ tsp black pepper

    Instructions

    1. Combine all ingredients in a mixing bowl.
    2. Coat pork chops with the mix in a zip‑lock bag.
    3. Marinate 2–4 hrs (cold).
    4. Grill or pan‑fry chops 4–5 min per side.
    5. Rest 3 min, serve with a balsamic glaze drizzle.
    6. Honey Mustard Pork Chops
      Marinade ingredients
    • 3 tbsp honey
    • 2 tbsp Dijon mustard
    • 1 tbsp whole‑grain mustard
    • 2 tbsp olive oil
    • 1 tsp garlic powder
    • 1 tsp salt
    • ½ tsp black pepper

    Instructions

    1. Whisk all ingredients together.
    2. Add chops to a dish and smother with marinade.
    3. Marinate 1–3 hrs in fridge.
    4. Cook on grill or skillet 4 min per side.
    5. Rest 3 min, enjoy the sweet‑tangy bite.
    6. Chili Lime Pork Chops
      Marinade ingredients
    • 3 tbsp lime juice
    • 1 tbsp lime zest
    • 2 tbsp olive oil
    • 1 tsp chili powder
    • 1 tsp garlic powder
    • 1 tsp paprika
    • 1 tsp salt
    • ½ tsp black pepper

    Instructions

    1. Mix everything into a paste.
    2. Rub chops with the mixture, place in a bag.
    3. Marinate 2–4 hrs (refrigerated).
    4. Grill or sear chops 4–5 min each side.
    5. Rest 3 min, serve with lime wedges.
    6. Barbecue Pork Chops
      Marinade ingredients
    • ¼ cup barbecue sauce
    • 2 tbsp brown sugar
    • 2 tbsp lemon juice
    • 1 tsp chili powder
    • 1 tsp salt
    • ½ tsp black pepper

    Instructions

    1. Stir all ingredients into a thick sauce.
    2. Coat pork chops fully in the BBQ mix.
    3. Marinate 2–4 hrs in fridge.
    4. Grill chops 5 min per side, basting with extra sauce.
    5. Rest 3 min, dig in.

    General tips

    • Use bone‑in chops for extra flavor.
    • Pat chops dry before searing for a nice crust.
    • Always check internal temp reaches 145 °F for safe eating.

    You got all six full recipes with cooking instructions, straight to the grill 🔥👌. Enjoy your pork chop marathon! 🍴😎

    BANG BANG SHRIMP RECIPES

    Yo, here are the full recipes and step‑by‑step instructions for the three shrimp dishes you posted 🍤👌.

    🌶️ Bang Bang Shrimp
    Ingredients

    • 1 lb large shrimp, peeled & deveined
    • 1/2 cup cornstarch
    • 1/2 tsp salt
    • 1/2 tsp black pepper
    • 1/4 tsp garlic powder
    • 1/4 tsp paprika
    • 1/4 cup buttermilk
    • Vegetable oil (for frying)

    Instructions

    1. Toss the shrimp in cornstarch, salt, pepper, garlic powder & paprika until coated.
    2. Dip each coated shrimp in buttermilk, then back into the cornstarch for a double coat.
    3. Heat vegetable oil in a deep pan to medium‑high (about 350°F/175°C).
    4. Fry the shrimp in batches for 2–3 min until golden & crispy.
    5. Drain on paper towels. Serve hot with your fave sauce or just sprinkle extra salt.

    🧀 Garlic Parmesan Shrimp
    Ingredients

    • 1 lb large shrimp, peeled & deveined
    • 2 tbsp unsalted butter
    • 4 garlic cloves, minced
    • 1/2 tsp crushed red pepper flakes
    • 1/4 cup grated Parmesan cheese
    • 1 tbsp fresh parsley, chopped
    • Salt & black pepper, to taste
    • Lemon wedges (for serving)

    Instructions

    1. Melt butter in a large skillet over medium heat.
    2. Add minced garlic & red pepper flakes; sauté 30 s until fragrant.
    3. Toss in the shrimp, season with salt & pepper, and cook 2–3 min per side until pink.
    4. Sprinkle Parmesan cheese over the shrimp, stir to melt and coat evenly.
    5. Finish with chopped parsley. Serve with lemon wedges for a zing.

    🔥 Cajun Garlic Butter Shrimp
    Ingredients

    • 1 lb large shrimp, peeled & deveined
    • 2 tbsp butter
    • 1 tbsp olive oil
    • 4 garlic cloves, minced
    • 1 tbsp Cajun seasoning
    • 1/2 tsp smoked paprika
    • 1/2 tsp salt
    • 1/4 tsp black pepper
    • 1/4 tsp red pepper flakes (optional)

    Instructions

    1. Heat butter & olive oil in a skillet over medium‑high heat.
    2. Add garlic and sauté 20 s until aromatic.
    3. Mix in Cajun seasoning, smoked paprika, salt, black pepper & red pepper flakes.
    4. Add shrimp to the skillet; cook 2–3 min each side until they turn pink & get a nice crust.
    5. Serve straight from the pan, maybe with rice or crusty bread to soak up the sauce.

    Enjoy whipping up these bad‑boy shrimp dishes! 🍴😎👍

    #easyrecipe09 #cooksclub09 #easyrecipe006

  • Home – Easy Recipes – Dishes – Cooking Guide

    HOW TO MAKE BURRATA RECIPE STEP-BY-STEP GUIDE

    Here are  several detailed recipes for making burrata at home. While the core principles are similar across recipes, the methods vary in complexity, from simpler versions using pre-made cheese to more advanced ones starting from milk.

    For a quick overview, the table below compares the key aspects of the different methods found in the search results.

    Recipe Approach Key Ingredients Skill Level Process Summary
    Using Pre-Made Mozzarella Curd Fresh mozzarella curd, salt, heavy cream Intermediate Stretch curd in hot water, create filling (stracciatella), form a shell, fill, and seal.
    Starting from Milk (Full Process) Milk, thermophilic culture, rennet, citric acid, heavy cream Advanced Make mozzarella from scratch, create stracciatella filling from shredded curd and cream, then form the burrata.
    Using Leftover Cheeses Pre-made mozzarella, ricotta or mascarpone, heavy cream (optional) Beginner Form mozzarella into disks, fill with ricotta/mascarpone, pinch closed, and chill.

    🧀 Detailed Step-by-Step Guide (Using Mozzarella Curd)

    This method is a popular choice for home cooks as it balances authenticity with approachability.

    Ingredients & Equipment
    You will need3/4 pound of fresh mozzarella curd, a generous amount of salt, and heavy whipping cream. Have ready a large heatproof bowl, a slotted spoon, a thermometer, and a small deep bowl for shaping. Wearing gloves or having a bowl of cold water to dip your hands in is highly recommended as the cheese will be very hot.

    Step 1: Prepare the Curd for Stretching

    · Cut the mozzarella curd into uniform pieces. You will use about one-third of the total curd for the filling and the rest for the outer shell.
    · Bring a pot of water to a boil, then let it cool slightly to around 160-180°F (70-80°C). It should be as salty as pasta water.
    · Pour the hot salted water over the portion of curd meant for the filling. Let it sit for a few minutes until the curds begin to soften and stick together.

    Step 2: Make the Stracciatella Filling

    · Once the curd is malleable, stretch and fold it until it becomes smooth and glossy.
    · Pull this mass into a long rope, then tear it into small, stringy pieces. Place these “little rags” (stracciatella) into a bowl.
    · Pour in enough heavy cream to saturate the cheese strings and add salt to taste. Stir gently to combine, then set the filling aside.

    Step 3: Form the Mozzarella Shell

    · Place the remaining mozzarella curd in the heatproof bowl and cover it with more hot salted water. Repeat the stretching process until you have a smooth, lump-free ball of mozzarella.
    · Instead of forming a ball, shape this mozzarella into a disk about 6 inches (15 cm) in diameter. Make the center thicker and the edges slightly thinner, like a small pouch. If the cheese tears, briefly dip it back in the hot water to repair it.

    Step 4: Fill and Seal the Burrata

    · Drape the mozzarella disk into a small, deep bowl. Spoon a generous amount of the stracciatella filling into the center.
    · Gently gather the sides of the mozzarella disk up and around the filling, pinching the top tightly to seal it. Dipping the pinched end back into the hot water for a second can help secure the seal.
    · Immediately place the finished burrata in an ice bath for a few minutes to firm up the shape.

    💡 Key Tips for Success

    · Don’t Overwork the Cheese: When stretching the mozzarella, stop as soon as it is smooth and shiny. Over-stretching can make the outer shell tough and rubbery.
    · Use High-Fat Dairy: For the creamiest, most authentic results, use high-butterfat heavy cream and high-quality milk if making curd from scratch.
    · Storage: Burrata is best enjoyed fresh. If you must store it, place it in a container covered with lightly salted water and keep it in the refrigerator for up to 2-3 days. It’s ideal to consume it within 24 hours for the best texture.
    · Flavor Variations: You can add other flavors to the filling, such as a drizzle of truffle oil, minced herbs, or chopped pistachios for a unique twist.

    I hope this guide helps you embark on your homemade burrata adventure! Which approach are you thinking of trying first?

    HOW TO MAKE MOZZARELLA CHEESE RECIPE AT HOME STEP BY STEP GUIDE

    Making mozzarella cheese at home is a rewarding process. You can choose between a simpler method using vinegar or a more traditional one with citric acid and rennet. The table below compares these two common approaches to help you decide.

    Feature Simple Vinegar Method Traditional Rennet Method
    Best For Beginners, quick results Authentic texture and flavor
    Key Ingredients Whole milk, distilled white vinegar, salt (optional) Whole milk, citric acid, rennet, cheese salt
    Acidifying Agent Vinegar Citric acid
    Coagulating Agent Vinegar Rennet
    Overall Texture Good, can be slightly less stretchy Typically smoother and more elastic
    Difficulty Level Easier Requires more precision

    🧾 Ingredients and Tools You’ll Need

    Before you start, gather your supplies. Using the right milk is the most critical step for success.

    Ingredients for the Traditional Method (1 gallon of milk) :

    · Milk: 1 gallon (3.78 L) of whole milk. Do not use ultra-pasteurized (UP) or ultra-high temperature (UHT) milk as it will not form proper curds . Pasteurized but not homogenized milk is ideal, and raw milk is excellent if you can get it.
    · Citric Acid: 1.5 teaspoons, dissolved in 1/2 cup of cool, non-chlorinated water .
    · Rennet: 1/4 teaspoon of liquid animal or vegetable rennet, dissolved in 1/4 cup of cool, non-chlorinated water . (You can also use a rennet tablet, crushed and dissolved ).
    · Salt: 1-2 teaspoons of non-iodized cheese salt, kosher salt, or flaky sea salt .

    Essential Tools:

    · A large, non-reactive pot (stainless steel is best)
    · Instant-read thermometer
    · Slotted spoon or spatula
    · Sharp knife for cutting curds
    · Colander or large strainer
    · Cheesecloth (optional, but helpful for cleanup)
    · Heatproof bowl for stretching
    · Rubber gloves (optional, for handling hot cheese)

    👩‍🍳 Step-by-Step Guide: Traditional Method

    Here is a walkthrough using the traditional rennet method, which yields a classic, stretchy mozzarella.

    1. Acidify the Milk: Pour the milk into your large pot. Stir in the dissolved citric acid solution .
    2. Heat the Milk: Slowly heat the milk over medium-low heat to 90°F (32°C), stirring gently. Once it reaches temperature, remove the pot from the heat .
    3. Add Rennet and Coagulate: Stir the dissolved rennet into the milk using an up-and-down motion for about 15-30 seconds to distribute it evenly. Then, stop stirring, cover the pot, and let it sit undisturbed for 5-15 minutes .
    4. Check for a “Clean Break”: After this time, the milk should have set into a solid gel. To test it, insert a clean knife at an angle and lift it up. If the curd splits cleanly, leaving clear whey, you have a “clean break” and can proceed. If it’s still liquidy, let it sit for a few more minutes .
    5. Cut the Curds: Use a long knife to cut the curd mass into a 1/2-inch to 1-inch grid pattern, making sure your cuts reach the bottom of the pot. This releases the whey from the curds .
    6. Cook the Curds: Place the pot back on low heat and slowly warm the curds to 105-108°F (41-42°C), stirring gently to keep them from matting. This helps firm them up. Once at temperature, turn off the heat and continue stirring for another 5-20 minutes .
    7. Drain the Curds: Pour the contents of the pot through a colander to separate the curds from the whey. You can save the whey to make ricotta cheese later .

    🧀 Stretching and Forming the Mozzarella

    This is the most hands-on and recognizable part of the process.

    1. Heat the Curds for Stretching: You need to heat the curds to around 135°F (57°C) internally to make them pliable. There are two common ways:
      · Using a Microwave: Place the drained curds in a microwave-safe bowl. Microwave on high for 30-45 seconds, then pour off the expelled whey. Repeat heating for 15-20 seconds and drain again until the cheese is hot and starts to melt together .
      · Using Hot Whey/Water: Heat the reserved whey or plain water to 170°F (77°C). Place the curds in a separate bowl and pour the hot liquid over them. Let them sit for a few minutes until they become soft and stretchy .
    2. Add Salt and Stretch: Sprinkle salt over the hot curds. Put on rubber gloves if the cheese is too hot. Start stretching the cheese like taffy and folding it back on itself. Repeat this stretching and folding until the cheese becomes smooth, shiny, and resistant to stretching .
    3. Form the Ball: Once the cheese is glossy and pliable, form it into a smooth ball by pulling the edges underneath. You can also make several smaller balls (bocconcini) or shape it into a log for cheese sticks .
    4. Cool the Cheese: Immediately place the finished mozzarella ball into a bowl of ice water for 10-15 minutes to set its shape and stop the cooking process .

    💡 Tips for Success and Troubleshooting

    Even with a good recipe, your first batch might need some troubleshooting.

    · If your cheese is tough or rubbery, you may have overworked it during the stretching stage. Next time, stretch it less .
    · If the cheese is crumbly and won’t stretch, it likely didn’t get hot enough during the stretching phase. Put it back in the microwave or hot water until it reaches the right temperature . Using too much citric acid can also cause this .
    · If the curds are soft and mushy, you may not have drained enough whey. Be sure to squeeze the curds well before heating and stretching .
    · Storing Your Mozzarella: Your homemade mozzarella is best eaten fresh but will keep in the refrigerator for up to one week. You can store it tightly wrapped in plastic wrap or, for a softer texture, submerged in a light saltwater brine in an airtight container . It also freezes well for up to six months, especially if shredded .

    I hope this guide helps you create delicious homemade mozzarella! Which method are you thinking of trying first?

    #easyrecipe09 #easyrecipe06 #cooksclub09# #cheeses

Design a site like this with WordPress.com
Get started